Dur: 15'
Welcome. In this workshop, participants build a real-world procurement system MVP using GitHub Copilot in VS Code and GitHub.

We are going to work on an existing procurement system. This system already has two main modules/pages:
- Dashboard
- PR (Purchase Requisition) module
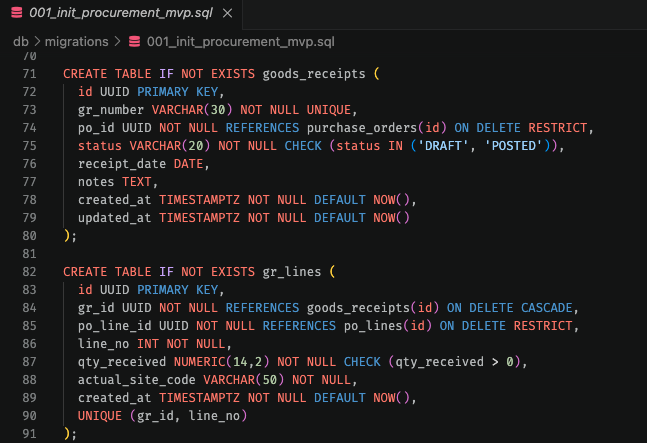
The aim is to build the PO (Purchase Order) module. Another module GR (Goods Receipts) is open for exploration. The tables for PO and GR modules are already in the database (after migration).
Application scope:
- Baseline provided: Home/Dashboard & PR module (list/create/detail pages and backend APIs)
- Participant backlog: PO module (list/create/detail pages and backend APIs)
- Optional extension: Bookmark feature (for PR, PO, & GR modules) via GitHub Issue workflow
- Further exploration: GR module (self-paced)
Tech stack:
- Backend: Fastify + JavaScript
- Frontend: Vue 3 + Vite + JavaScript
- Database: PostgreSQL in Docker
- Testing: Jest + Playwright
- Design: Figma + Figma MCP
- Support: Python

Dur: 10'
In this workshop we are going to build a procurement system MVP (minimum viable product). A procurement system manages how a company buys things, with control and traceability from request to receiving.
In simple terms, it helps answer:
- Who requested what?
- Who approved it?
- What was ordered from which vendor?
- What quantity has been received so far?
- What is still open or pending?
In this app, the workflow chain would be:
- Purchase Requisition (PR) → internal request for goods/items
- Purchase Order (PO) → official order sent to supplier to buy goods/items
- Goods Receipt (GR) → record that goods/items were received
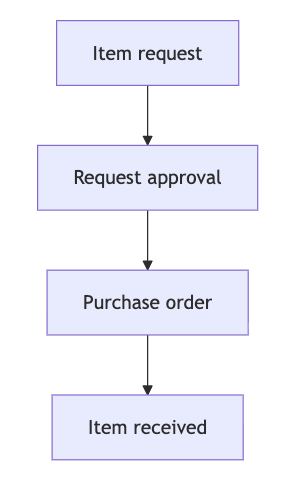
Definitions and Functions
Purchase Requisition (PR)
An internal document created by a requester (employee/department) to ask for goods or services.
Main function:
- Capture business need (item, quantity, required date, budget context).
- Run internal approvals before spending commitment.
- Does not go to vendor directly.
- Typical statuses:
DRAFT→SUBMITTED→APPROVED
Purchase Order (PO)
A commercial document issued to a vendor after PR approval.
Main function:
- Formally commit to buy specific items, quantities, and prices.
- Serve as the legal/operational ordering reference.
- Track what has been ordered and what remains open.
- In this workshop logic: PO lines are allocated from approved PR lines, and allocation cannot exceed PR remaining quantity.
- Typical statuses:
DRAFT→SUBMITTED
Goods Receipt (GR)
A record that goods (or service delivery) were actually received against a PO.
Main function:
- Confirm physical receipt (or service completion).
- Update received quantities.
- Provide proof for downstream matching/invoicing/payment.
- In this workshop logic: received quantity cannot exceed PO open quantity.
- Typical statuses:
DRAFT→POSTED
One practical example
- PR: Maintenance team requests 10 safety helmets.
- PO: Purchasing orders 10 helmets from Vendor A at agreed unit price.
- GR: Warehouse receives 6 helmets today and records GR; later receives remaining 4 and records another GR.
Result: system shows requested = 10, ordered = 10, received = 10, open = 0.
So, a procurement app is essentially a controlled pipeline for spending:
request → approve → order → receive
with quantities and statuses enforced at each step.
Dur: 10'
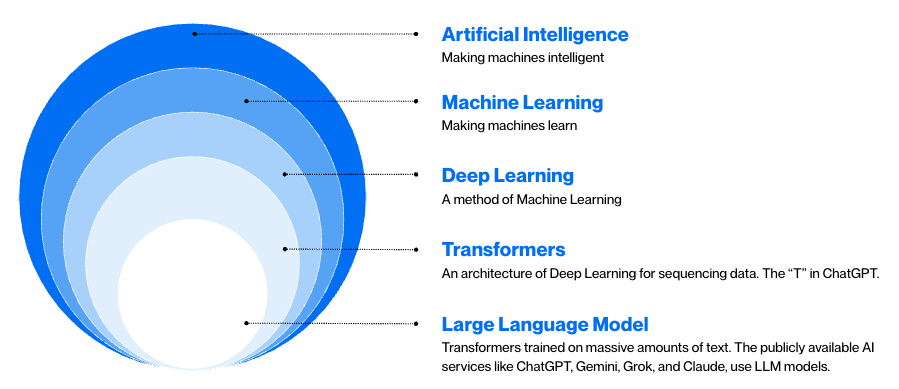
How do LLMs like GPT or Claude work? LLMs predict the next token based on the context provided to them. So, better context gives better output quality.
Prompt anatomy in GitHub Copilot:
- System instructions: global behavior and constraints
- User message: immediate task objective, the prompt written by the user
- Repository context: code, docs, config, the information available in the repo/workspace
Working rule for this workshop:
- If possible, attach relevant docs (markdown plans, actual code files, screenshots, etc.) with every prompt
- When working on something new, ask for a plan first. Afterwards, implement in small checkpoints
- Always validate the agent's work. You can outsource your code, but you must not outsource your understanding.
Dur: 10'
Open your favorite online LLM application (e.g., ChatGPT, Claude, Gemini, etc.) and write a prompt to recreate this image:
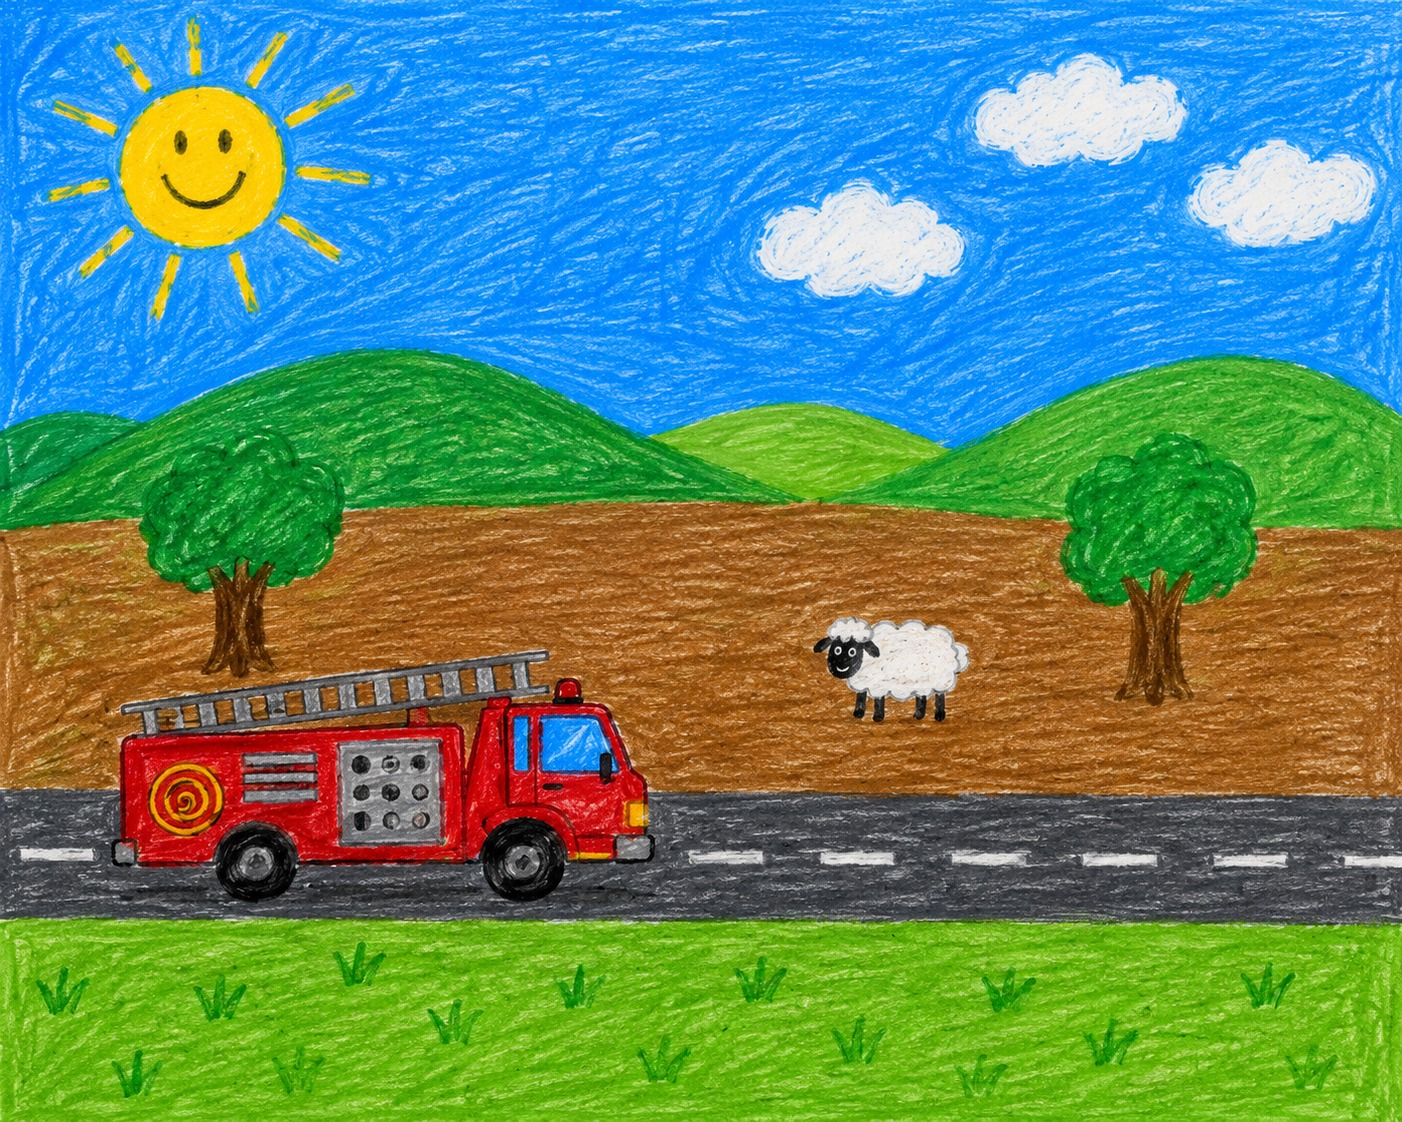
Dur: 10'
When working with an AI model, the problem (almost always) is not the AI. It is the brief you gave the AI. The gap is not technical—it is communicative. Prompting—communicating with an AI model—is a skill that we need to master so we can provide AI models with the best direction for it to complete its task. You have to make your intention as clear as possible.
- Lead with WHAT you need and WHY it matters. Let the agent work out the HOW.
- In human communication, brevity is a virtue; with AI agents, it is a liability. Be as comprehensive as you can.
- The devil is in the details. Leave nothing to chance. Let the model know every last tiny bit of information that you can provide.
Open discussion
Dur: 15'
The most expensive code an AI agent writes is the code you run without thinking. Today, the bottleneck is not anymore whether AI agents can write code. It's whether you can use them economically.
Let's breakdown some new (and old) ideas that can help us optimize AI token usage.
Develop your own analytical skills
1. Analysis is the real value
Can you describe the problem without ambiguity? Can you name the constraints? Do you know what success looks like before you ask the agent to start? If the answer to any of these is "not really," you are not ready to ask the agent. Spend time thinking and doing some research first.
2. Keep your instructions concise and human-written
Many teams make the mistake of using AI to generate their agent's persistent instructions or system prompts. Your instruction file is too important for that. Write it down by yourself.
3. Build architecture that speaks for itself
A tangled, poorly organized project forces the agent to fetch and inspect more files, read more code, generate more explanation of what things do. Good architecture is an optimization strategy. Treat it as such.
Be strategic about what agents actually do
4. Use MCP strategically
Model Context Protocol (MCP) servers are powerful, they are also expensive. Every MCP call is a roundtrip. Use MCP when you genuinely need the agent to interact with a system in real-time, in order to achieve your objective.
5. Avoid SKILL.md unless you actually need it
Most of the time, your SKILL.md is just repeating what it knows, wasting tokens on context that does not add value. If you find yourself writing a SKILL.md that is longer than a few paragraphs, ask whether the agent actually needs it. Most of the time, the answer is no.
Dur: 15'
(Continuing from our previous slide)
6. Divide work into sessions, not monoliths
Divide tasks into sequential sessions, eg. research-planning-implementation. Long session is expensive because the context window is bloated the entire time. And if context window is bloated, response quality declines. Bad response will cost you more token in the long run.
7. Choose the right model for the task
Not every task needs your most powerful model.
- A reasoning-class model (like Claude Opus or GPT-5.5) is excellent for planning, architecture, and debugging complex problems. It is also expensive. Use it when you need the thinking.
- Mid-tier models (Claude Sonnet, GPT-5.4) are workhorses: they handle most implementation tasks efficiently. Use them for writing code, generating content, refactoring.
- Smaller, faster models (Claude Haiku, GPT-5 mini) are excellent for repetitive tasks: updating documentation, adding simple features, running mechanical transformations. Use them for tasks where speed matters more than depth.
8. Use AGENTS.md to stop the agent early
A subtle but important detail: most agents will keep generating output until they hit their token limit. They are optimistic by default. Your persistent instruction file should include explicit stopping criteria.
Do not over-rely on agents for everything
9. Use deterministic tools when they exist
Want to check code quality? Use a linter. Want to find security issues? Use a scanner. Want to understand test coverage? Use an existing coverage tool. These tools are fast, deterministic, and cheap (often free). When you hand their output to the agent, the agent can focus on interpretation instead of discovery.
10. Create guardrails that do not require agents
Unit tests, linters, type systems, security scanning; none of these require tokens. All of them save tokens by preventing the agent from generating code that will need fixing later.
11. The agent is not your QA engineer
Validation is not optional. It is your job, and it saves you money in the long run by catching mistakes before they multiply.
Dur: 20'
In this workshop we are going to learn how to use specifications to create an application. But before we do that, let's try the reverse process.
In this exercise we are going to use Copilot to create specifications of an existing application.
- Open the web application at https://simplydemo.secure.simplybook.me/v2/dashboard/new
- Login using these credentials:
- login:
admin - password:
demo
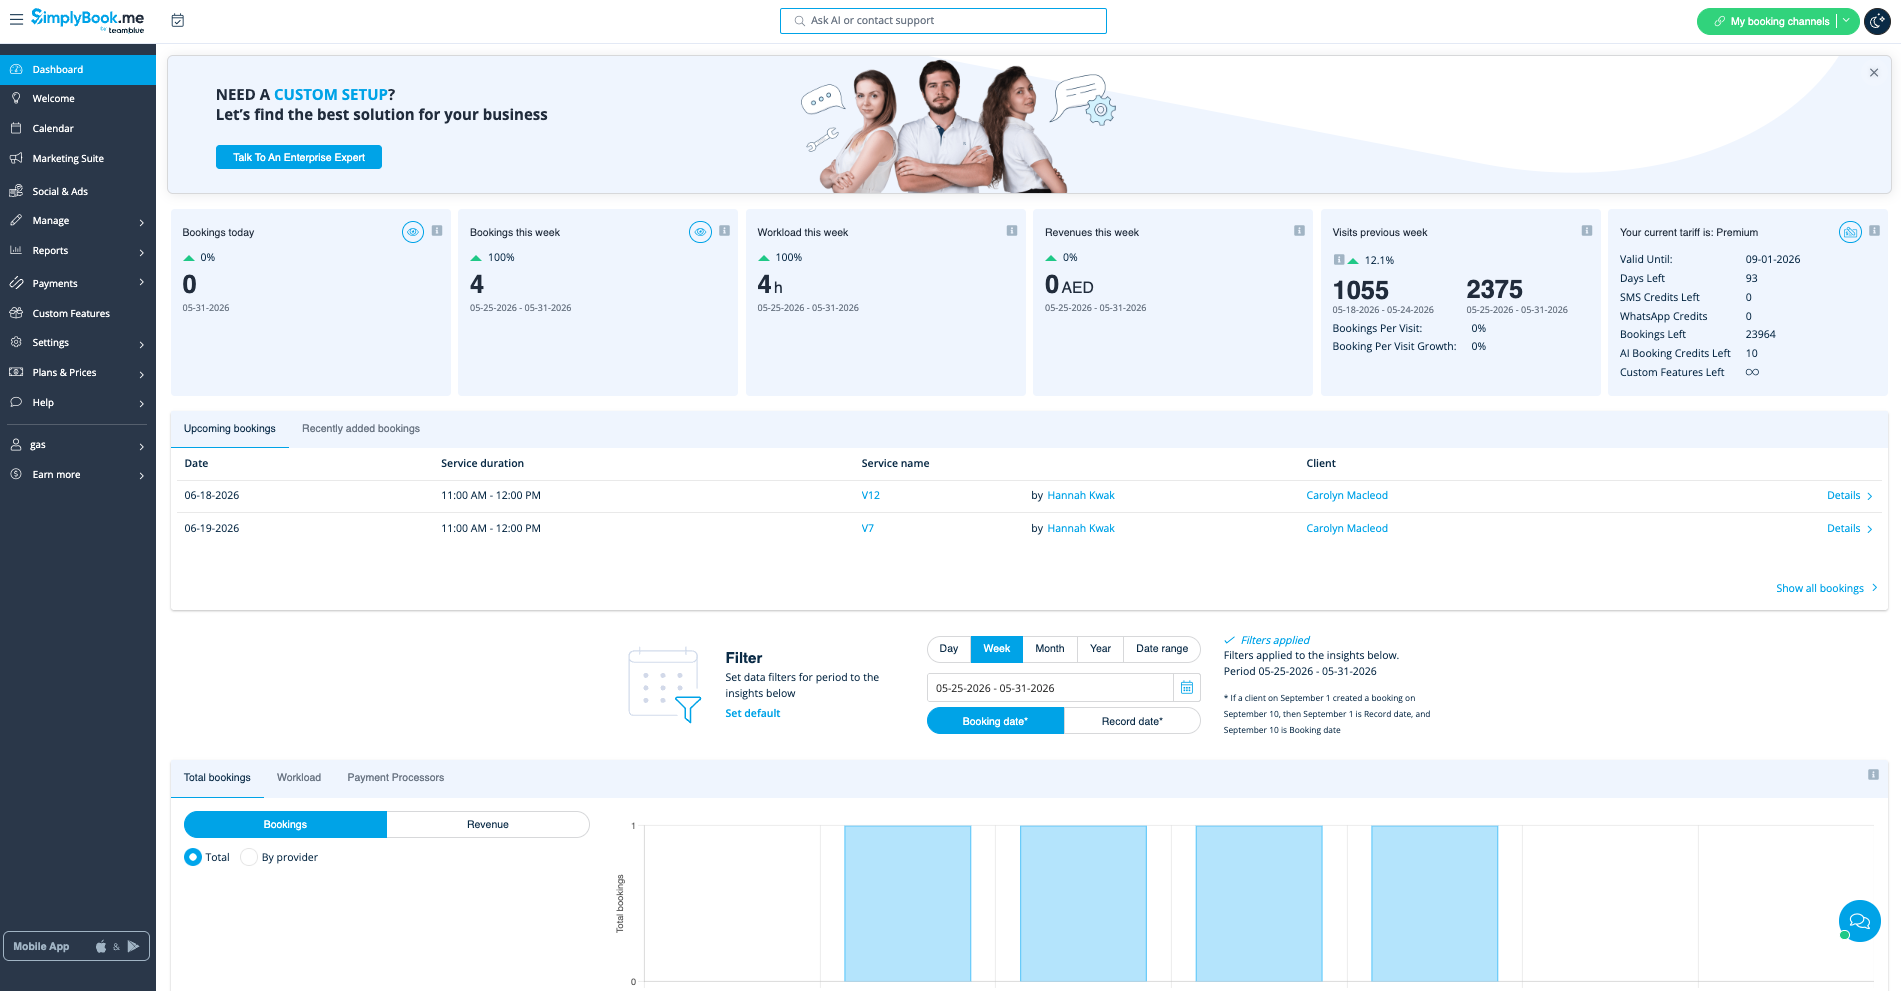
- Learn and observe as much as you can from that web application.
- Create a new workspace.
- Open the workspace in VS Code.
- Enter this prompt in Copilot Chat:
Create specification documents in markdown format for a web application that:
- <your observation>
- <your observation>
- <your observation>
- <your observation>
- <your observation>
- <etc.>
Run the prompt and wait for Copilot to finish creating the specifications.
Dur: 15'
We are going to conduct the previous exercise, but with new tools to help Copilot create better result.
Install an MCP server
An MCP Server (Model Context Protocol Server) is a universal adapter that securely bridges AI models with external tools, databases, and services.
For this exercise we are going to use the chrome-devtools MCP. It allows Copilot to perform browsing actions on a headless browser.
- Open the MCP configuration file in VS Code.
- Copy this line to connect VS Code to the MCP server:
"chrome-devtools": {
  "command": "npx",
  "args": ["-y", "chrome-devtools-mcp@latest", "--slim", "--headless"]
}
Prompt
Before executing the prompt, let's add a file to create a more comprehensive context.
- Create a new workspace.
- Open the workspace in VS Code.
- Create a file called
plan.md - Put the content below in
plan.md:
Based on the following url https://simplydemo.secure.simplybook.me/v2/dashboard/new, create a comprehensive specification of a fully working web application with the following structure template.

specs/
└── features/
    ├── README.md                          # Feature catalog / index
    ├── _template/                         # Boilerplate for new features
    │   └── feature-template.md
    │
    └── F-001-online-booking/              # One folder per feature
        ├── overview.md                    # Summary, goals, value prop
        ├── user-stories.md                # Stories + acceptance criteria
        ├── screens.md                     # Screens involved + states
        ├── wireframes/                    # Visual mockups
        │   ├── 01-service-select.png
        │   ├── 02-time-pick.png
        │   └── 03-confirmation.png
        ├── business-rules.md              # Logic, validations, policies
        ├── data-model.md                  # Entities, fields, relationships
        ├── edge-cases.md                  # Error states, empty, conflicts
        ├── permissions.md                 # Who can do what (RBAC)
        ├── notifications.md               # Emails, SMS, in-app triggers
        ├── analytics.md                   # Events tracked, KPIs
        ├── dependencies.md                # Other features, 3rd parties
        ├── test-scenarios.md              # Gherkin / acceptance tests
        └── open-questions.md

1. Use [chrome-devtools-mcp](https://github.com/ChromeDevTools/chrome-devtools-mcp) to access the web application above.
2. Use the following credentials to access the application:
  - login: `admin`
  - password: `demo`
Once the file plan.md is ready, enter this prompt in Copilot Chat:
Use the file #plan.md to conduct a reverse engineering process, ie. from application to specification documents.
Dur: 5'
- Latest VS Code
- GitHub Copilot extension
- GitHub account + Copilot license
- Docker Desktop running
- Node.js 20+
- Git
- Figma account (recommended)
- Python
- uv Python package and project manager (recommended)
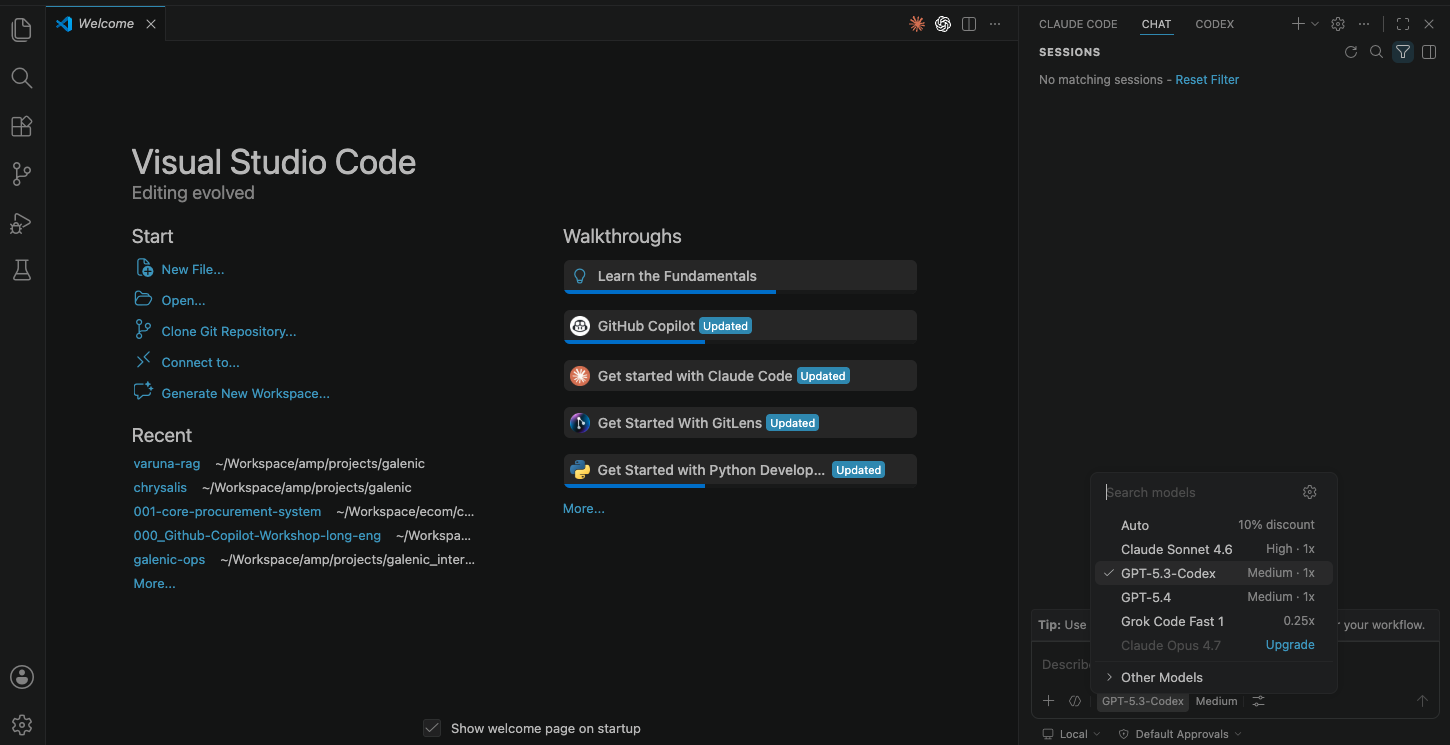
Optional MCP tools:
- VS Code extension Markdown Preview Enhanced
- GitHub MCP Server
- Figma MCP integration available in Copilot/agent environment
Dur: 15'
Open the project URL: https://github.com/eComindo/2026-github-copilot-workshop
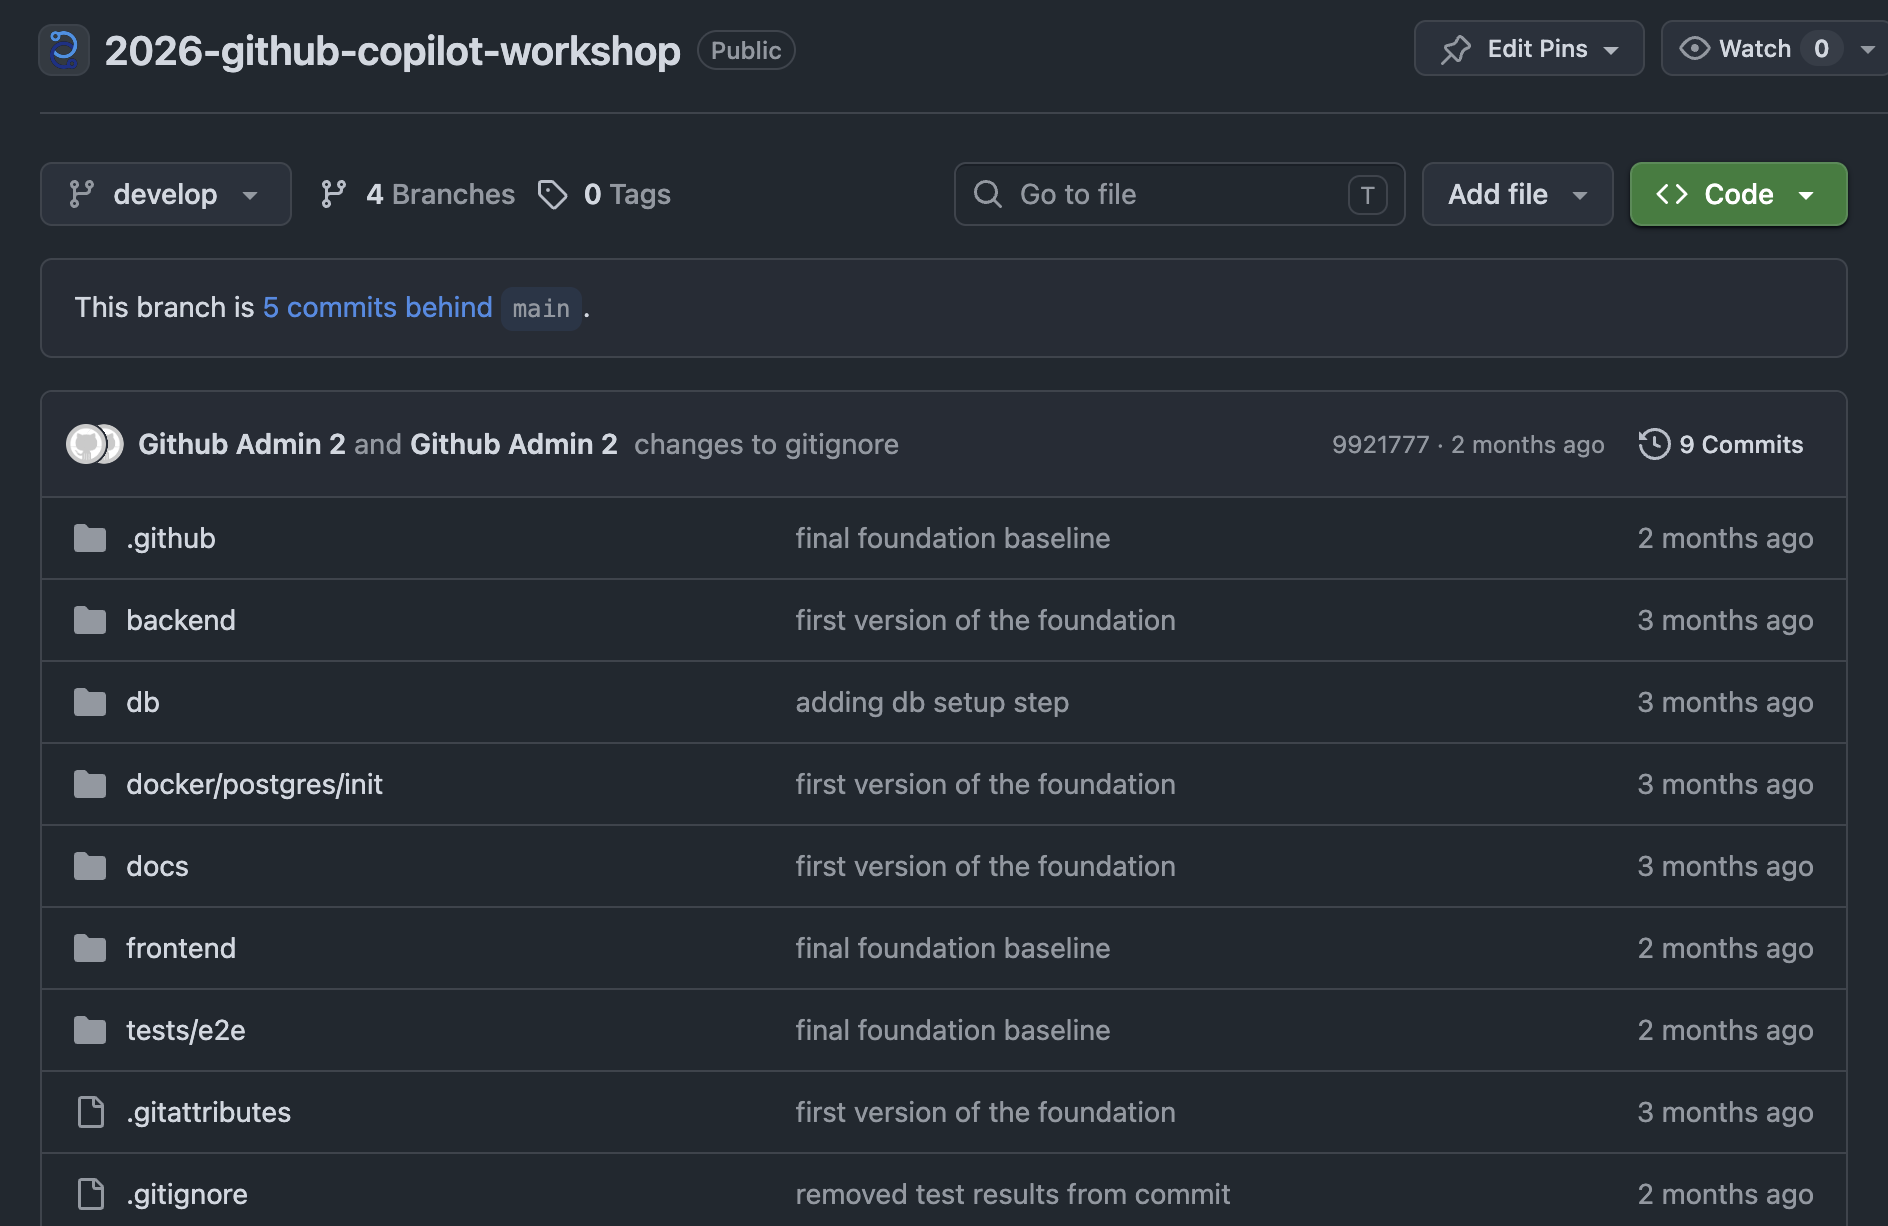
- Open the project URL in your browser
- Fork the repo. You can click the Fork button, on the top right
Open discussion
Dur: 15'
Go to your forked repo and clone it to your local machine.
1. Set up the repo
git clone https://github.com/<your-username>/<forked-repo>.git
cd <repo>
git checkout -b feature/po-module
Ensure project references:
docs/plan.mdAGENTS.md
2. Prepare the database
Bootstrap files used by all participants:
db/migrations/001_init_procurement_mvp.sqldb/seeds/002_seed_procurement_mvp.sqldocker/postgres/init/00-init-mvp-db.sh
Cross-OS readiness note:
- Bootstrap supports Windows, macOS, Linux via LF line endings for
.shand.sqlin.gitattributes
Dur: 20'
Bootstrap workshop database (schema + sample data):
chmod +x docker/postgres/init/00-init-mvp-db.sh
docker compose down -v
docker compose up -d db
What this does:
- Creates PostgreSQL volume from scratch
- Applies baseline schema migration
- Inserts workshop sample data for Home/Dashboard + PR baseline
Verification:
docker compose exec -T db psql -U workshop -d procurement_mvp -c "SELECT COUNT(*) FROM purchase_requisitions;"
Dur: 20'
1. Install libraries
Run npm install 3 times, each in:
/(project root)backend/frontend/
2. Config for backend server
Create backend's environment variable: backend/.env:
PORT=3000
DATABASE_URL=postgres://workshop:workshop@localhost:5433/procurement_mvp
The backend server is running on port 3000.
3. Config for frontend server
Create frontend's environment variable: frontend/.env:
VITE_API_BASE_URL=http://localhost:3000
This will tell the frontend the URL of the backend service.
4. Start the application
To run the app, execute npm run dev from root.
Open the app (frontend server) on http://localhost:5173.
Base expectations:
- Home/Dashboard works
- PR list/create/detail works
- PR APIs connected to DB
Dur: 20'
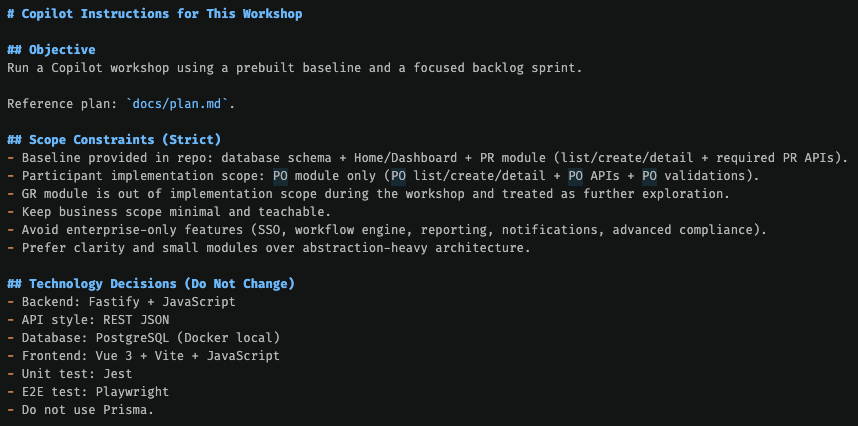
Before implementation, update custom instructions to shape Copilot output quality.
Make sure you are in Ask mode, then enter this prompt:
Review this repository instruction file and improve it with a concise checklist for implementation quality, testing, and documentation discipline.
Manually open AGENTS.md. Based on the answer, add instructions to make sure the content of AGENTS.md is more consistent with project standards
You can also add rules such as:
- Always check
docs/plan.mdbefore large changes - Add tests for new logic
- Use descriptive naming
- Update docs when introducing new flows
Example of the AGENTS.md file we are using for this project:
Dur: 15'
Tool: RTK
RTK is installed globally on our computer. It is a tool (written in Rust) that filters and compresses command outputs before they reach your LLM context.
Installation
Homebrew (recommended)
brew install rtk
Cargo
cargo install --git https://github.com/rtk-ai/rtk
Verify installation
rtk --version
Check token savings stats
rtk gain
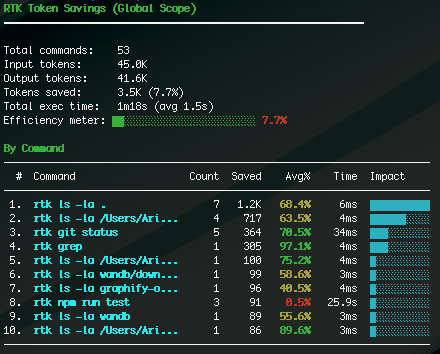
Usage
Add these lines into AGENTS.md:
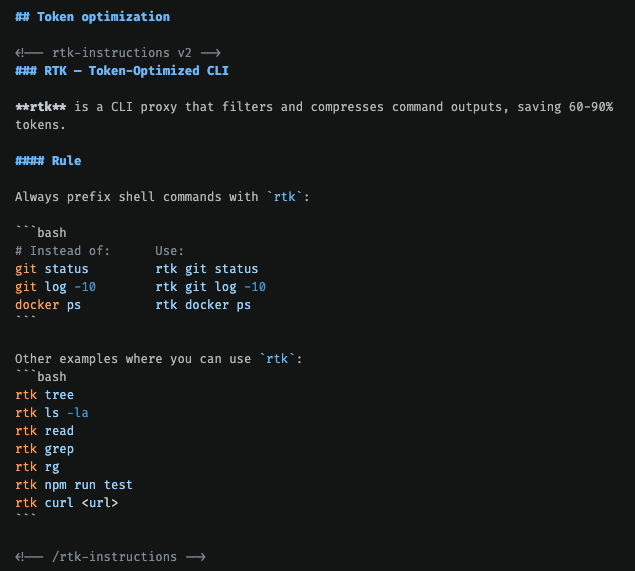
Example text:
Dur: 20'
Tool: Graphify
Graphify is a set of tools for AI coding assistants. By combining Tree-sitter static analysis with LLM-driven semantic extraction, Graphify turns an entire repository — including source code, documentation, research papers and diagrams — into an interactive graph that explains both what the code does and why it was designed that way.
In this example we are going to use a tool (written in Python) to build a queryable knowledge graph from our repo's documents and codebase.
Installation
*Note that there are two "y"'s in the installation command. But the installed tool will only have one "y"
uv tool install graphifyy
Configuration
When scanning the repo to create a knowledge graph, we can choose not to use LLM, so no token cost.
To make sure Graphify creates a pure, AST-based knowledge graph of only our source code (costing $0 and zero LLM tokens), let's first create the .graphifyignore file and fill it with this:
# Ignore documentation and text assets
*.md
*.txt
*.pdf
*.html

# Ignore images, diagrams, and video walkthroughs
*.png
*.jpg
*.jpeg
*.svg
*.mp4
*.wav

# Ignore config and infrastructure files (which sometimes trigger semantic parsing)
*.yaml
*.yml
*.json
*.toml

# Ignore generated build artifacts and test output (contain minified code that pollutes the graph)
playwright-report/
test-results/
coverage/
graphify-out/

# Ignore HTML files (build output, reports)
*.html
Then run this to start the scanning process:
graphify .
Graphify will look at the code files (e.g., .py, .js, .go, .rs, etc.), pull them through the local syntax tree parser, and write the final knowledge graph directly to graphify-out/graph.json without making a single network call.
Usage
Add this to AGENTS.md:
## Codebase Context & Knowledge Graph Protocol

You have access to a pre-computed AST knowledge graph of this repository at `graphify-out/graph.json`. To minimize context window clutter, prevent hallucinations, and accurately map cross-file dependencies, you MUST follow these routing rules:

1. **Consult the Graph First:** Before writing plans, making sweeping structural modifications, or tracing function call blast-radii, read `graphify-out/graph.json`. Filter nodes to only those whose `id` paths start with `backend/` or `frontend/src/` — nodes from `playwright-report/`, `test-results/`, and `coverage/` are minified build artifacts and must be ignored.
2. **Identify God Nodes:** Rank nodes by edge degree. The highest-degree nodes are the structural hubs (e.g., service files, route registries). Avoid duplicating responsibilities already owned by a god node.
3. **Trace Structural Paths:** If the user asks about relationships between modules or layers (e.g., how the API layer reaches the DB), do not grep blindly. Traverse the `links` array in `graph.json` to find the actual dependency path.
4. **Graph State:** The graph is derived strictly via AST extraction — no documentation or semantic layer. Treat all node hierarchies and import edges as 100% extracted truth (`EXTRACTED` confidence tier). Do not infer structure that isn't in the graph.
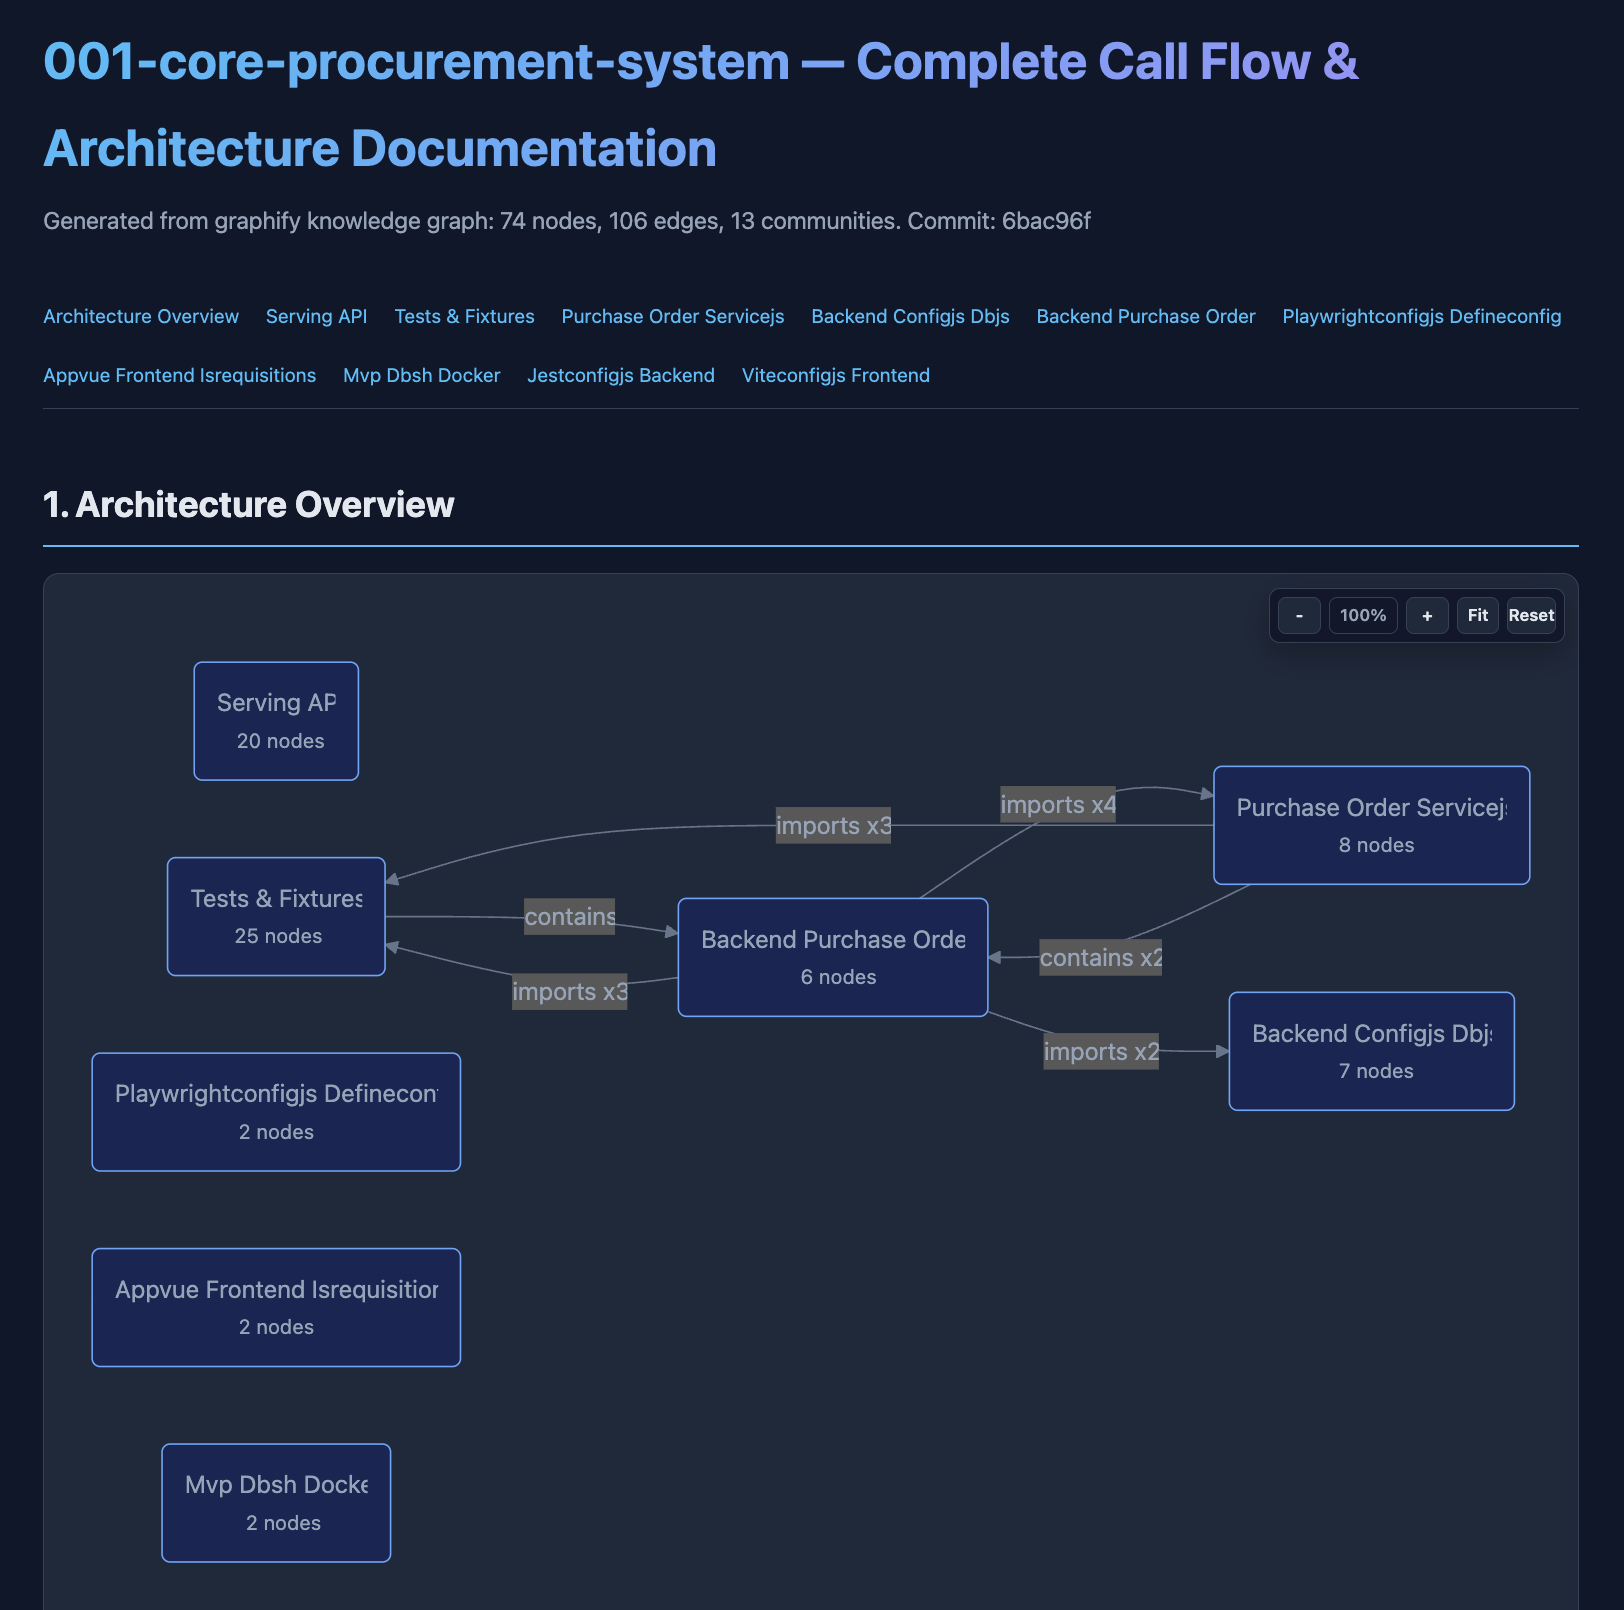
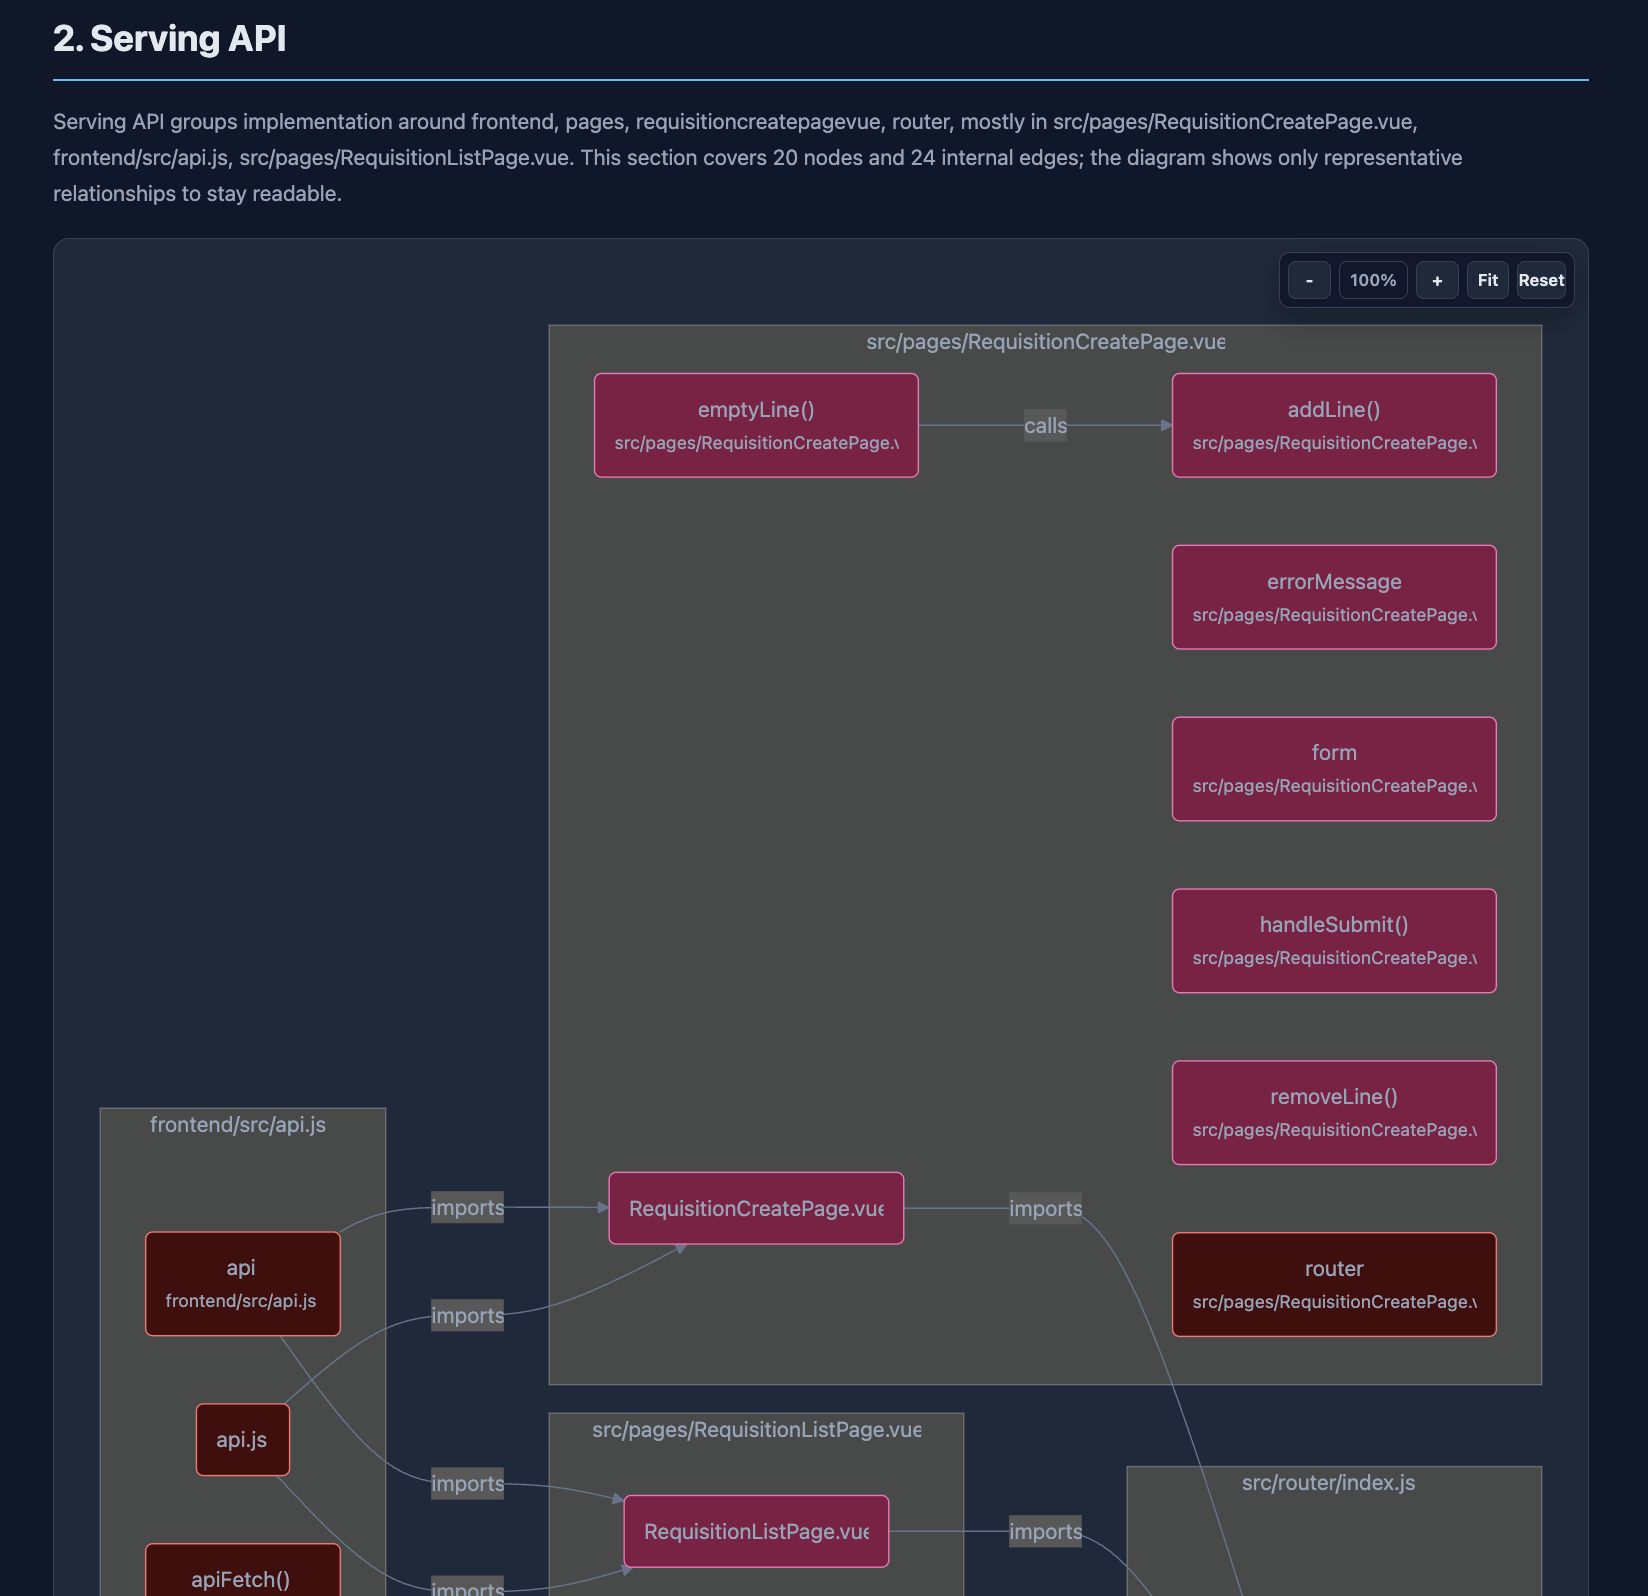
To visualize the graph, run this command:
uvx --from graphifyy graphify export callflow-html
Dur: 10'
 Image source: Vibe Coding Is Dead. Here's What Replaced It.
You probably have experienced this pattern:
- You write a prompt describing roughly what you want
- Copilot generates something plausible
- You iterate — adjusting, correcting, re-running
- Eventually it looks right
This works for fast prototyping. It does not work for production-grade, maintainable, auditable software — especially in a regulated banking environment. The output is only as precise as your prompt, and prompts are inherently imprecise.
What is a "spec"?
A "spec" (short for specification) is a structured, human-readable document that defines:
Section | What it captures |
Intent | What this feature is meant to accomplish — in one sentence |
Behavior | Inputs, expected outputs, state changes |
Constraints | Performance requirements, security boundaries, architecture rules |
Edge cases | Boundary conditions, failure scenarios, unexpected inputs |
Acceptance criteria | Testable, unambiguous, one per line |
Data | What data is touched, its classification, handling requirements |
A spec is not code. It is not a design document. It is the contract between intent and implementation.
Dur: 10'
1. What is SDD
Spec-driven development (SDD) is a software engineering approach where structured, human-readable specifications are the primary artifact and "source of truth".
Why SDD matters:
- Vibe-coded output is fast, but often inconsistent and unmaintainable
- Product-grade output needs explicit design documents ("specs")
- Reduces ambiguous prompts and rework
- Makes requirements and edge-cases visible before coding
- Produces artifacts that are easier to review by dev, QA, and product
2. How to start using SDD
There are various libraries and frameworks that help you create an SDD pattern (we will discuss them at the end of the workshop). We can start by setting up your own preferred pattern. To make sure your development follows spec-driven development guidelines:
- Create and maintain spec docs before large features. You can store it in a specific folder called
plans/ordocs/in your repo/workspace. - Keep guardrail docs for architecture, naming, and patterns, e.g., in a
guidelines/folder. - If required, you can create a dedicated document that explains the tech-stack decisions and coding conventions.
Dur: 10'
Use Copilot Spaces for onboarding and product brainstorming.
Create a space:
- Name:
Procurement MVP Onboarding - Attach:
README.md,docs/plan.md
Prompt 1 (onboarding):
Create a new team member onboarding summary for this repository.
Explain the business flow (PR -> PO -> GR), tech stack, and first 3 tasks.
Prompt 2 (brainstorming):
For this procurement MVP, suggest 5 realistic enhancements for a future version.
Keep workshop scope unchanged and mark each as out-of-scope for today.
Dur: 10'
To start this project, we use an already created plan document, the spec for the MVP. Use Copilot Plan mode with docs/plan.md attached and enter the following prompt.
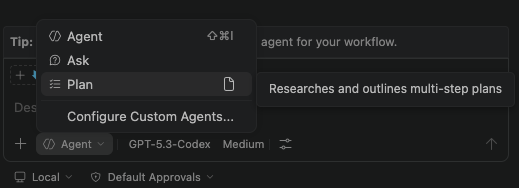
Validate this plan for an MVP.
Return a strict task sequence with checkpoints.
Focus implementation on PO backlog.
Once you are satisfied with the plan, switch to Agent mode:
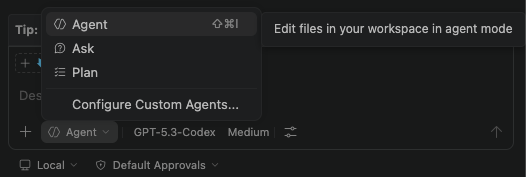
Save the refined checklist to docs/runbook.md.
Here we are creating another "spec" document, a document that contains all the items the agent needs to implement in order to create the MVP.
Dur: 10'
Agent skills are folders of instructions, scripts, and resources that Copilot can load when relevant to improve its performance in specialized tasks. The Agent Skills specification is an open standard, used by a range of different AI systems.
You can create your own skills to teach Copilot to perform tasks in a specific, repeatable way—or use skills shared online, for example in the anthropics/skills repository or GitHub's community-created github/awesome-copilot collection.
How a skill works
A SKILL.md file contains structured instructions that tell Copilot how to behave when the skill is invoked — what inputs to look for, what outputs to produce, what format to follow, and what constraints to apply. Copilot reads the skill as context before responding, which makes its output consistent and predictable across team members and sessions.
Dur: 15'
1. Adding "skills" support
Create a new folder .github/skills
This will be the location for all the skill configurations.
2. Add a Vue.js best practices skill
- Create a new folder
.github/skills/vue-best-practices - In that folder, create a new file
SKILL.md - Copy the raw content of the markdown document in this link to that file you have just created.
3. Add a Figma design implementation skill
Sometimes skills include other configuration files, not just the SKILL.md file.
- Create a new folder
.github/skills/figma-implement-design - As usual, in that folder, create a new file
SKILL.md - Copy the raw content of the markdown document in this link to that file you have just created.
- Download or recreate the rest of the files in the https://github.com/openai/skills/tree/main/skills/.curated/figma-implement-design folder.
Dur: 10'
Before we start with the PO module implementation in our procurement system MVP, let's validate the backend API first. Use the Agent mode and enter this prompt:
Add Swagger/OpenAPI support to this Fastify JavaScript backend.
Use @fastify/swagger and @fastify/swagger-ui.
Expose API documentation at /api-docs.
The goal is:
- Add Swagger/OpenAPI support
- Start backend and open Swagger UI
- Verify baseline PR endpoints are listed and callable
Dur: 20'
Figma is the default tool for designing frontend pages and user interfaces. Adding Figma MCP allows the AI model to access a Figma file directly.
Modify the MCP config
- Use the Command Palette, open the MCP configuration file
mcp.json.
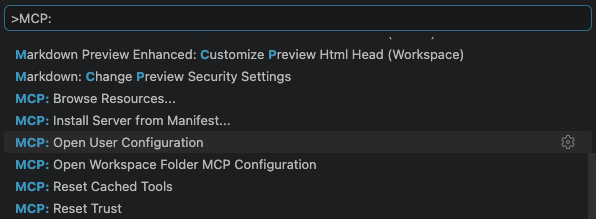
- Add Figma configuration in the
mcp.jsonfile.
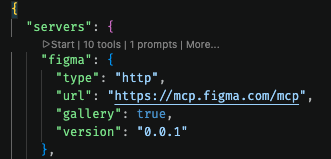
Important Note
Before you ask Copilot to access a Figma file, make sure that:
- you are logged in to Figma
- confirm workshop file and node IDs are accessible
- confirm that the Figma file owner has already assigned access to you
Dur: 10'
Start developing the PO module by generating the Create PO page. We will be using a design in Figma to create the frontend codes.
Use Agent mode in Copilot chat and enter the prompt below:
Using Figma MCP, generate Vue code for the PO Create page from this Figma file https://www.figma.com/design/1PpeiduceHdtCB0Qds30am/Github-Copilot--Workshop-?node-id=38-323&p=f&t=QJcJvfEN1Kpy8NGa-0
Include reusable components for header form and line allocation table.
Do not implement API calls yet. Keep structure simple.
Scope for generated page:
- Header section (vendor, PO date, notes)
- Line table section (approved PR open lines, allocate qty, unit price)
- Actions (save draft, submit)
Dur: 15'
Ask Copilot to help us create unit tests for the pages we have just created. Enter this prompt:
Create unit tests for important backend functions.
Focus on services that provide lists to the frontend.

Create Jest tests for frontend validations.
Focus on rendering of pages and components.

Keep tests readable.
Unit test result: 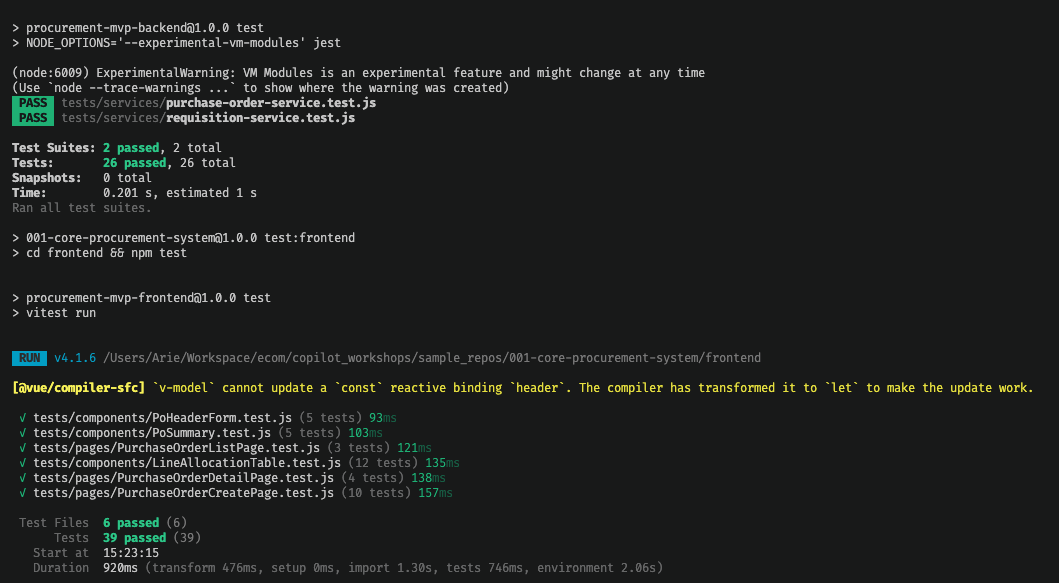
Unit test coverage report: 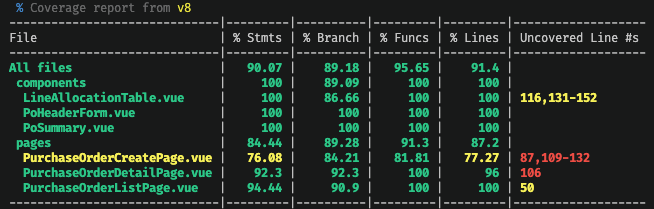
Dur: 10'
It is best practice to have a document that tracks the status of the project. This can help Copilot get context on the overall status of the system we are building. Use Agent mode and enter this prompt:
Analyze this repository and summarize what is already implemented.
Identify the available API endpoints for PO module.
Document the latest state of the project in `docs/progress.md`.
The goal here is to make Copilot aware of what has been done and avoid redundancy.
Dur: 20'
Use this prompt to start integrating the Create PO page. Attach the related documents to provide context to Copilot.
Integrate the available PO endpoints with the "Create PO" page.
Keep generated Figma components and wire them to purchase order APIs.
Special request for the module functionality:
- enforce over-allocation validation against PR remaining quantities
- return 422 for rule violations with clear messages
The end result should be a working PO Create page.
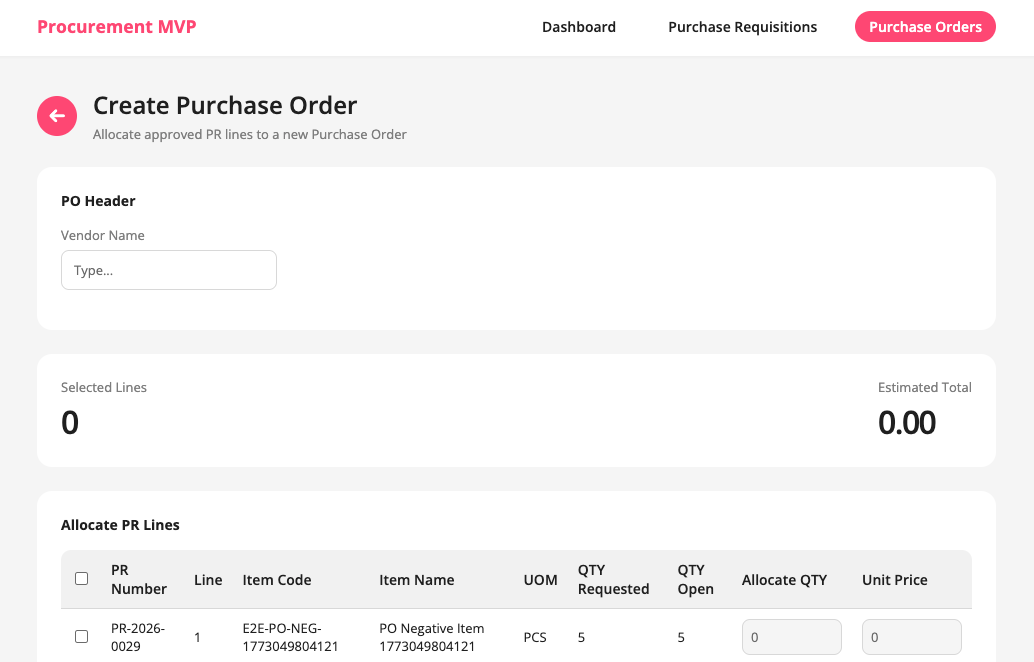
Dur: 30'
Create the rest of the PO module pages and connect them to the PO module API endpoints. We don't have Figma file for these pages, so ask Copilot to follow the existing design rules (using available codes as context).
Finish the PO module.
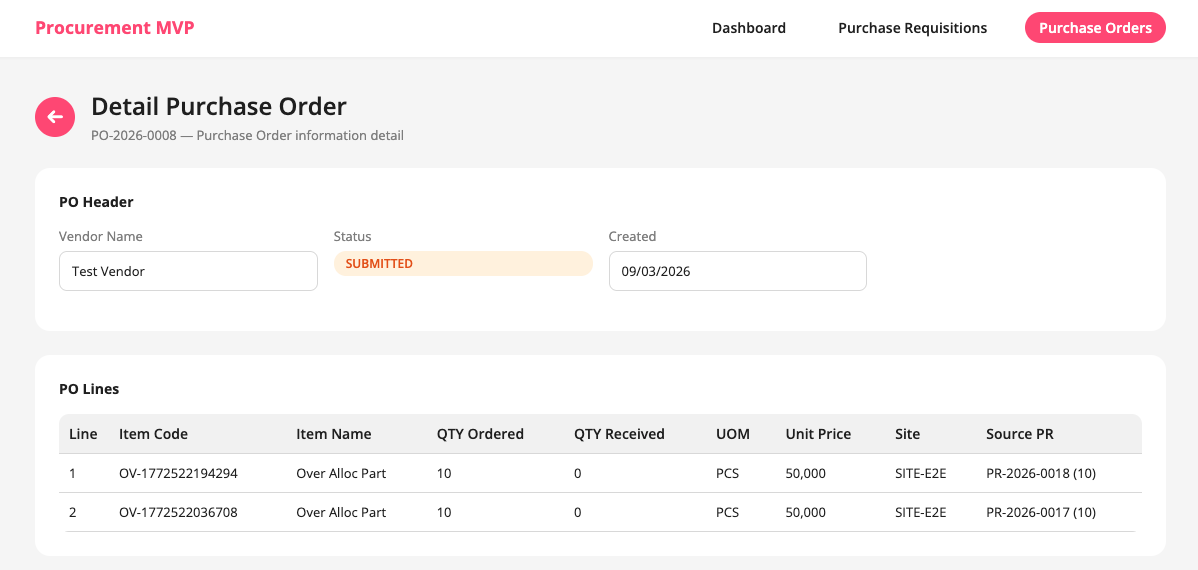
Implement PO list and detail pages in Vue using existing patterns.
Keep UI simple for clarity and follow the existing design system.
Use existing components when possible. Only create components that aren't already available.
Connect the new pages with the existing backend API endpoints for PO module.
The end result should be
- PO List page
- PO Detail page
Dur: 15'
GitHub offers various features to make sure our project is secure and reliable. But before we take a look into those features, let's try something we can implement locally.
Git hooks let us do a lot of things. They are triggered by the git command. In this example we will make a hook that does pre-push checks, that can block low-quality pushes quickly.
Create the hook
Create a new .git/hooks/pre-push file.
Then enter this prompt:
Create a git hook pre-push script that runs npm test and blocks the push if there's a failed test.
Copy the script provided by Copilot to the file you have just created.
Below is an example of a simple pre-push script that runs npm run test:unit:
#!/bin/sh

set -eu

echo "Running unit tests before push..."
cd app
npm run test:unit
Make sure you implement a script that runs the unit tests and cancels the push if an error is found.
Test the hook
Before testing the hook, make sure the hook file is executable:
chmod +x .githooks/pre-push
Then:
- Create a failing test
- Create a git commit
- Push the commit and check the result
Dur: 15'
Code Quality is a feature from GitHub that allow scanning of the codes in your repository.
GitHub Code Quality helps you ensure your codebase is reliable, maintainable, and efficient. It provides actionable insights and automated fixes so you can improve and maintain the code health of your repository efficiently.
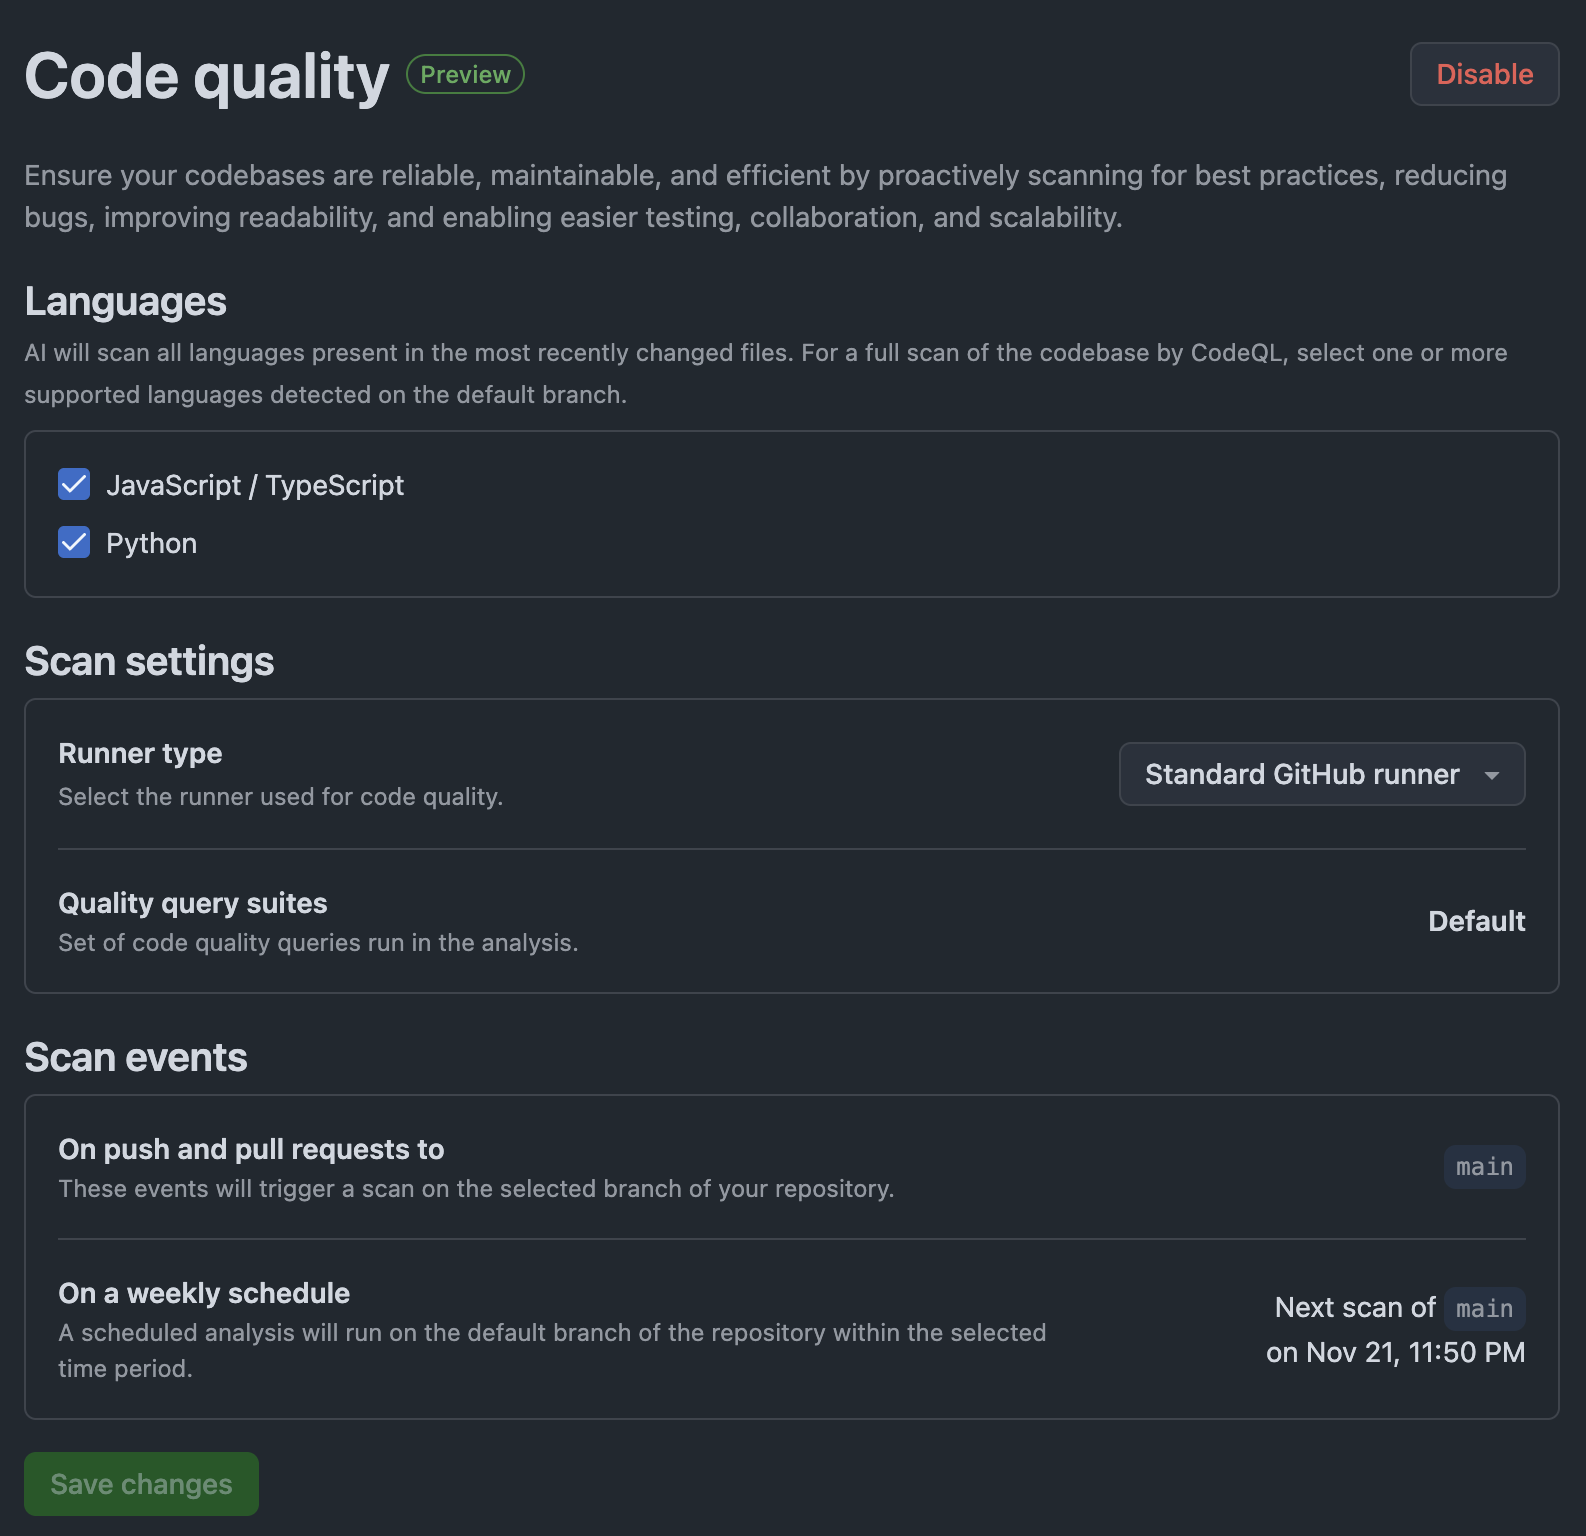
Code Quality performs rule-based analysis of the following languages using CodeQL:
- C#
- Go
- Java
- JavaScript
- Python
- Ruby
- TypeScript
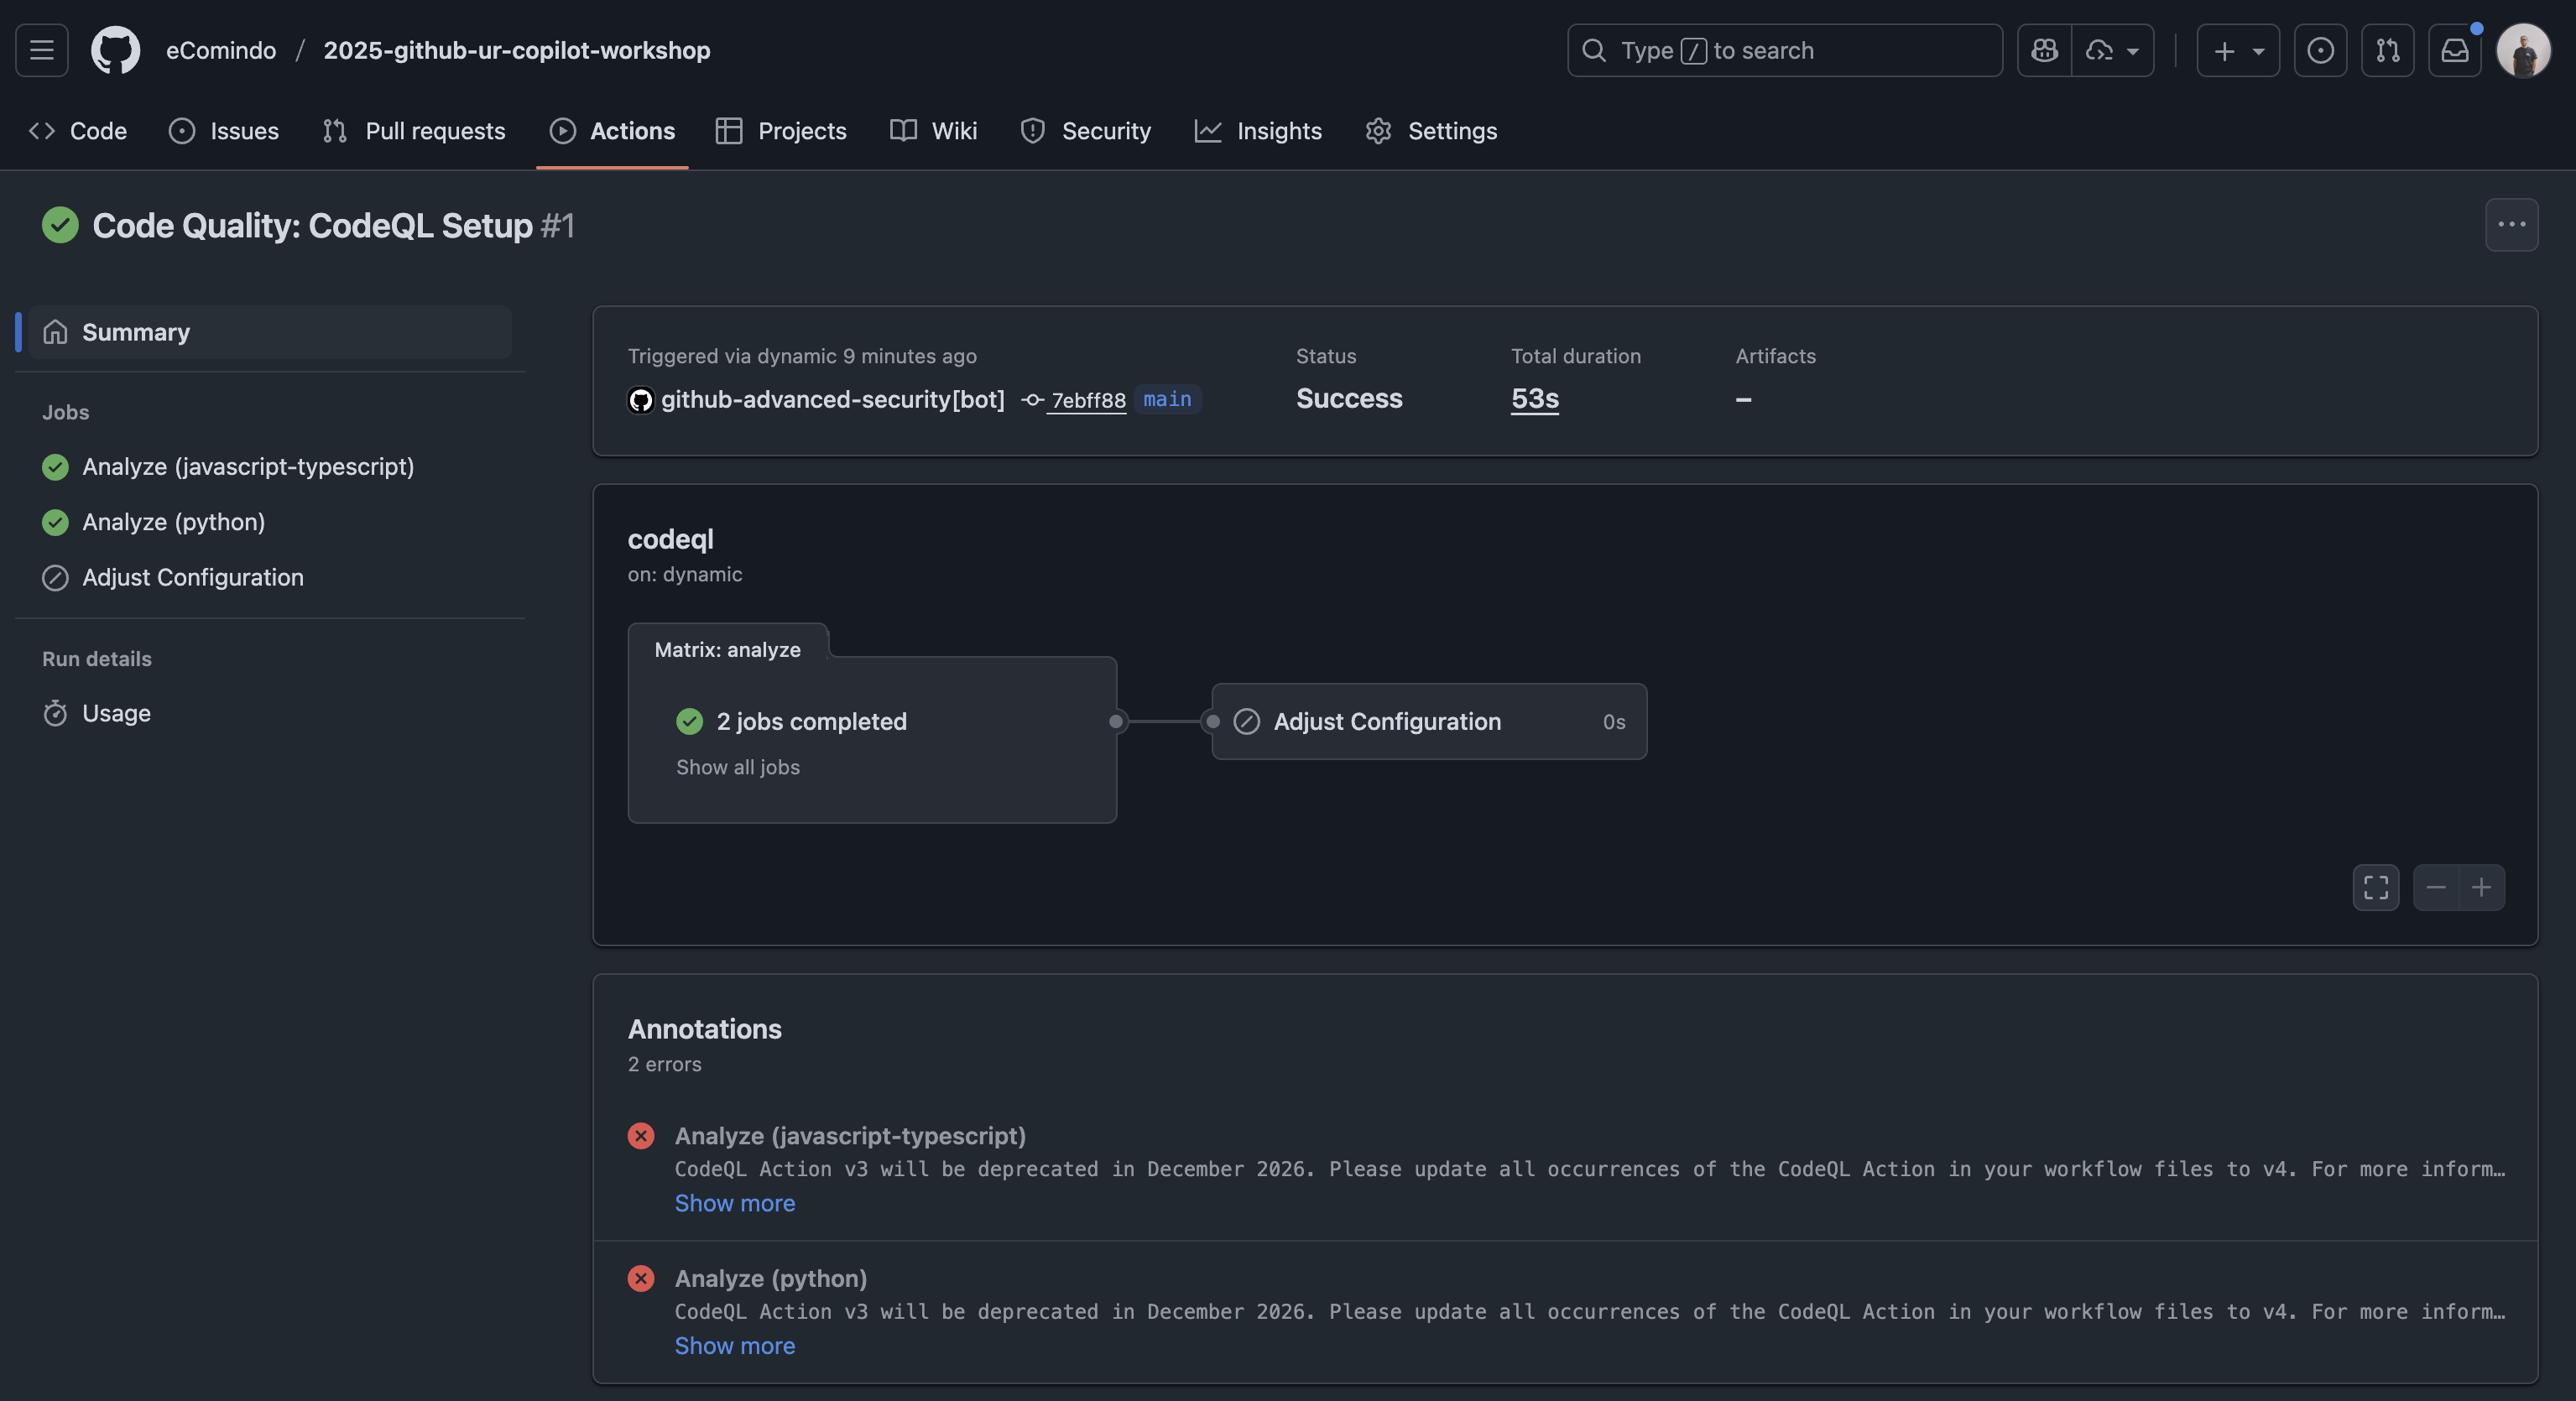
We can check the progress and result of Code Quality in the Actions tab of the repository:
Dur: 10'
To enable and run checks:
- Enable the Code Quality and Code Scanning features in the Settings
- Ensure CodeQL analysis is available in your codebase
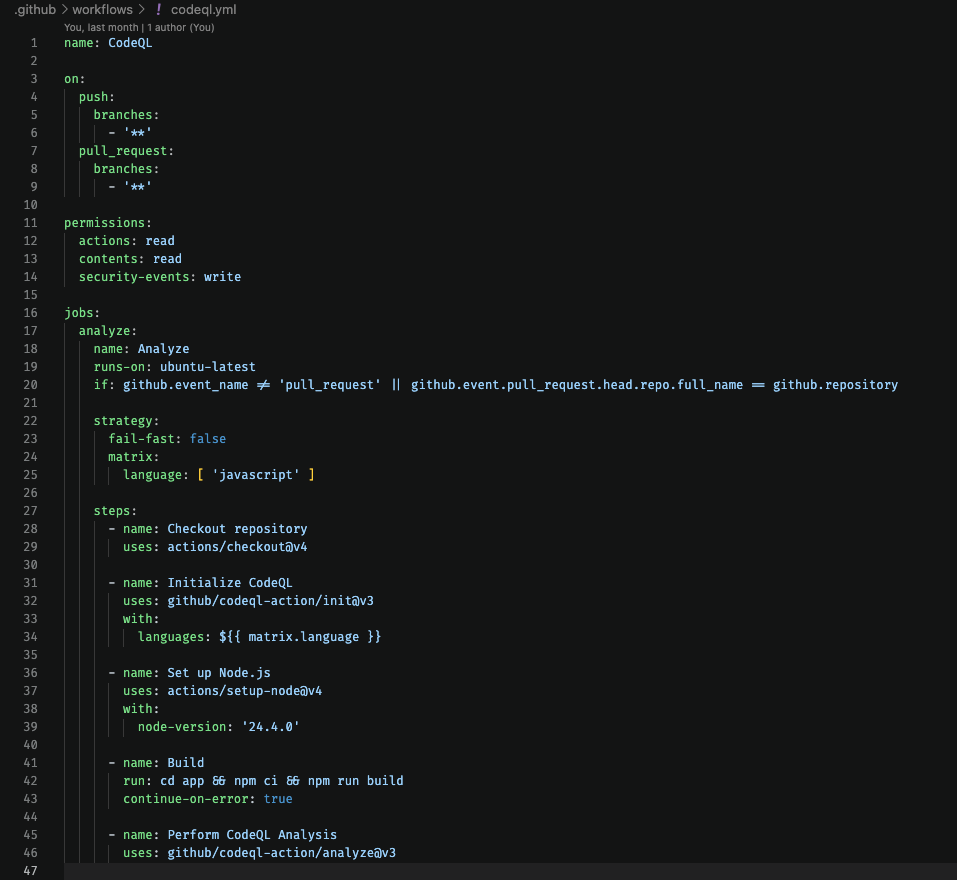
We can ask Copilot to create the workflow file:
Create a GitHub Actions workflow for JavaScript CodeQL analysis.
Run on push and pull_request for main and feature branches.
Code Scanning scans your codebase and commits for vulnerabilities like hardcoded API key and secrets.
Dur: 20'
Copilot is also available on Github's website. Click on this link to open Copilot on Github.
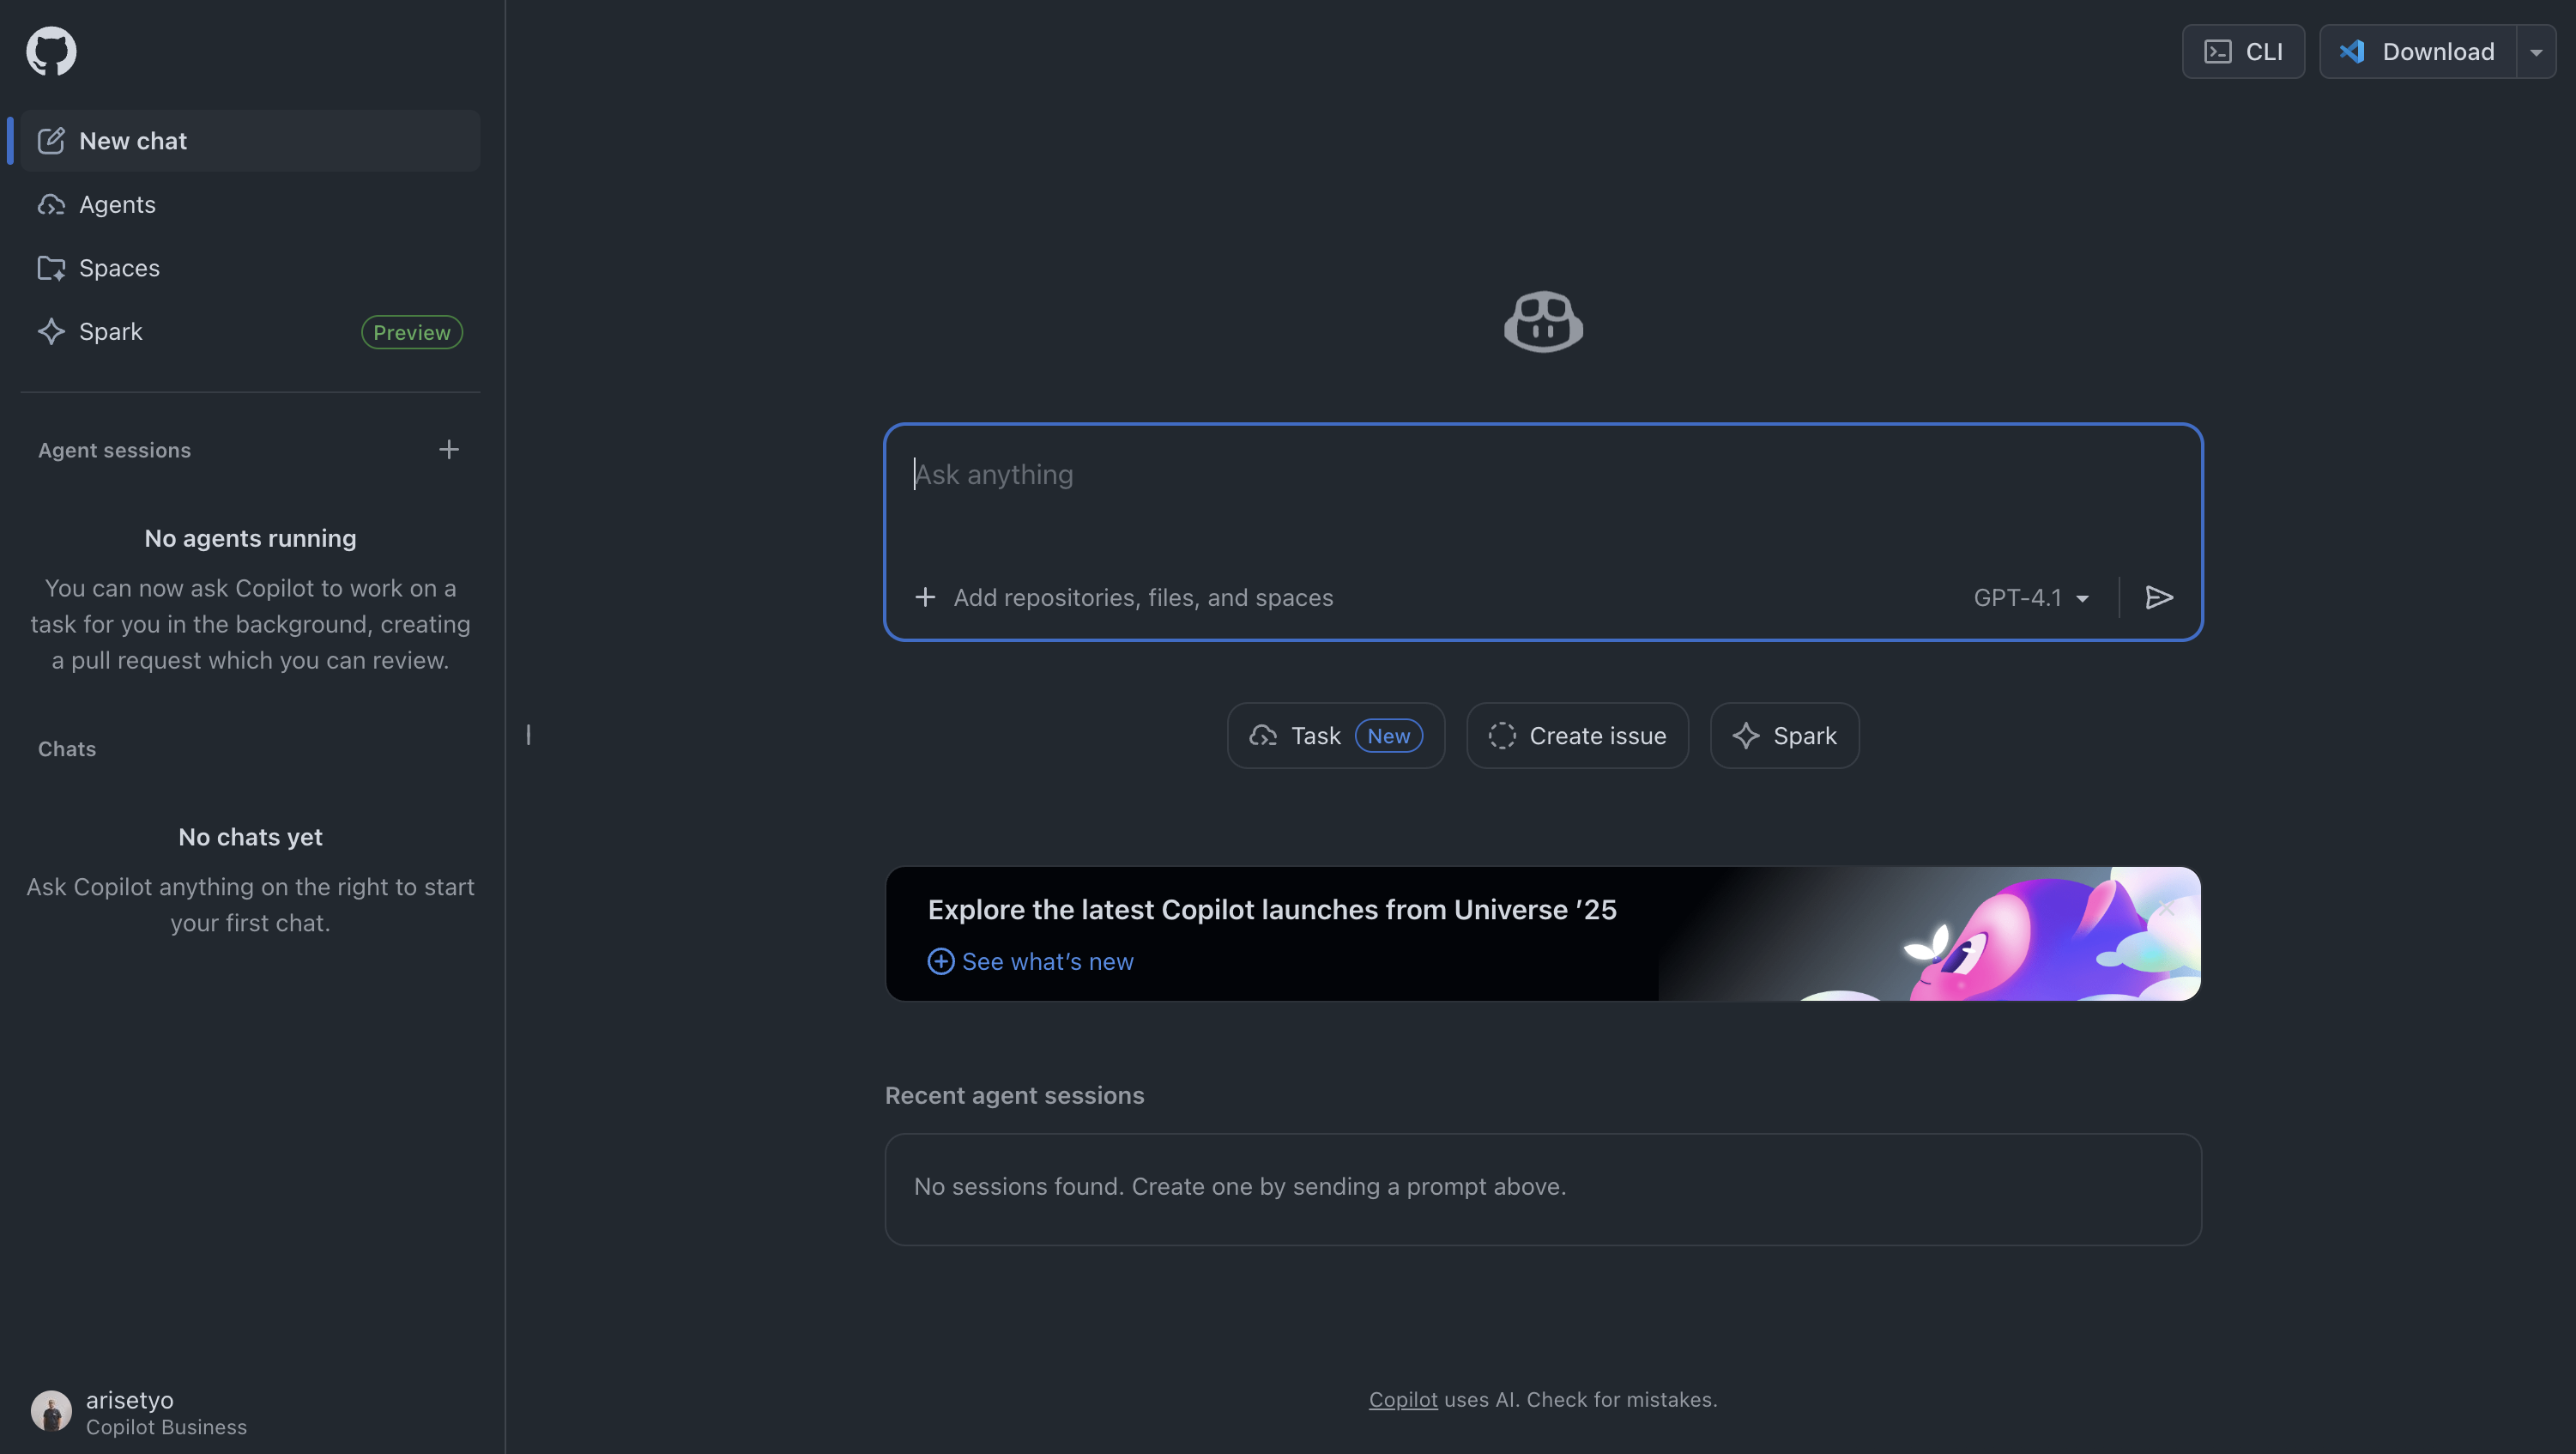
Let's see some of the things Copilot can do for us in the Github website.
1. Add PR Summary
We can ask Copilot to add Pull Request description.
- Commit the changes from the previous slide.
- Push to your repo.
- Open your Github repo page, create a new Pull Request.
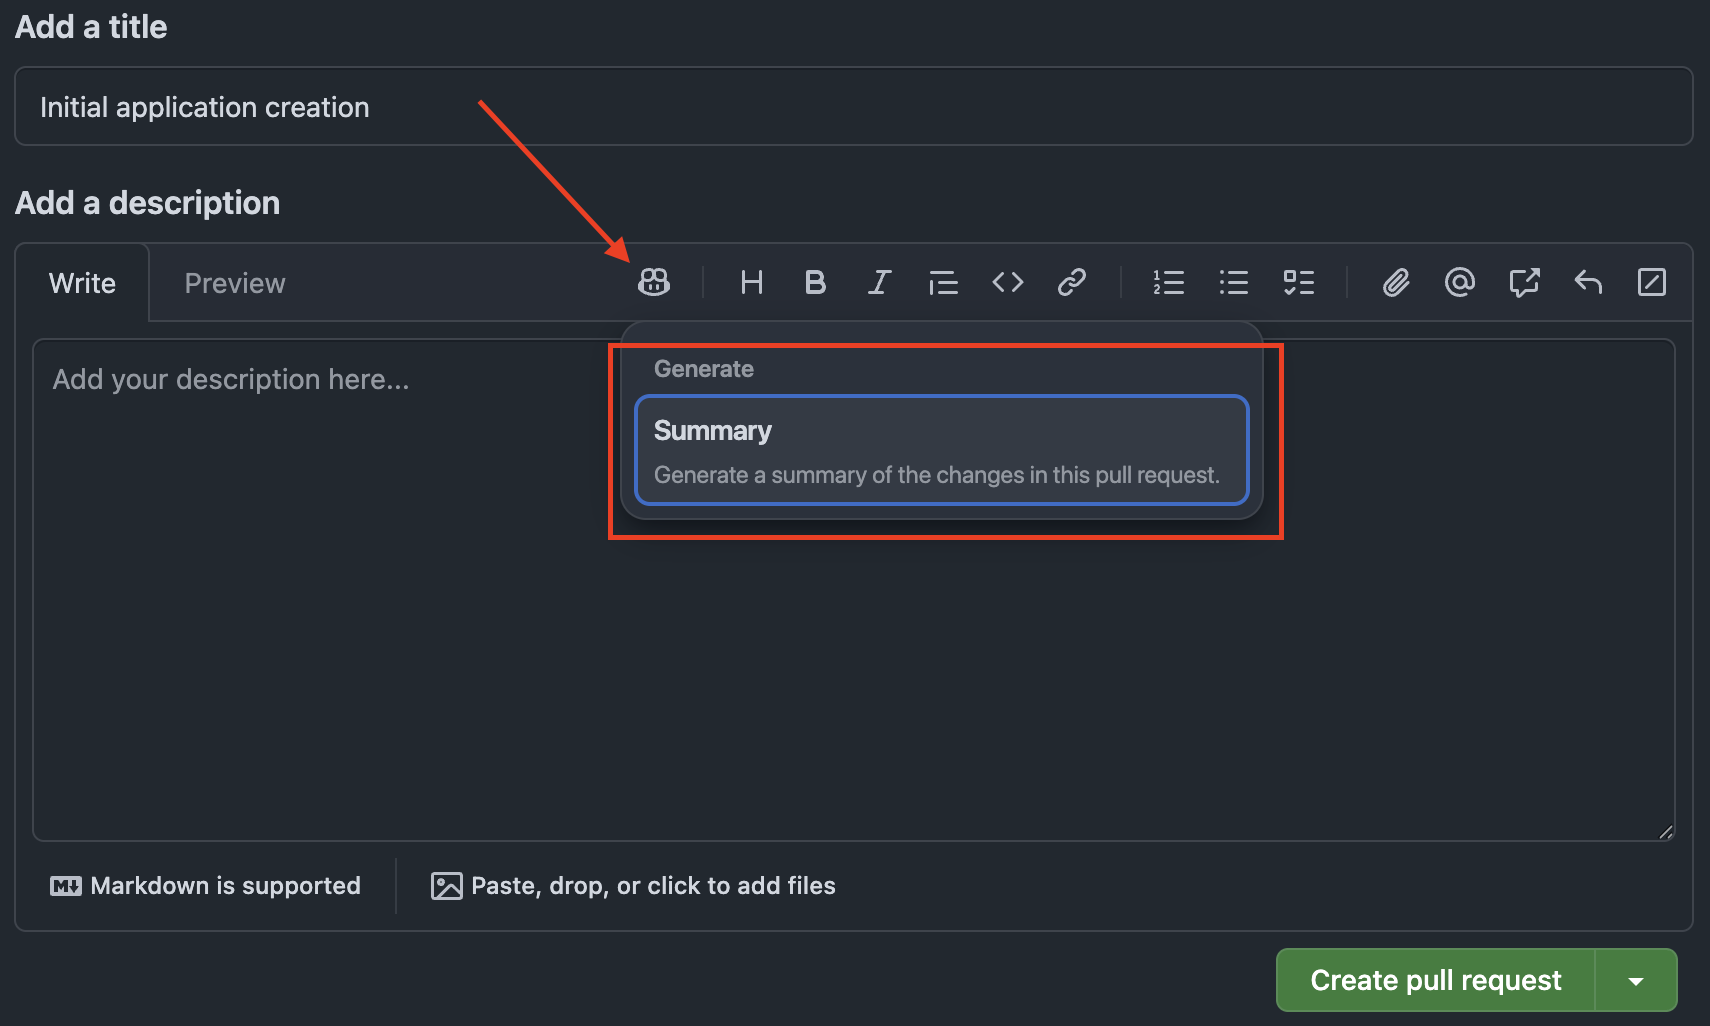
The summary from Copilot: 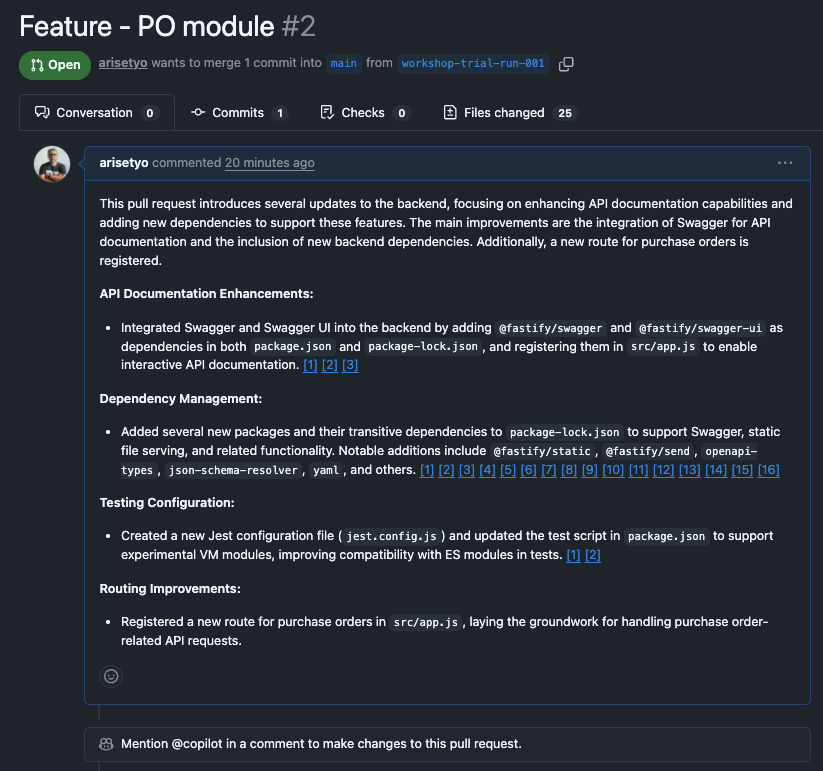
It will create a comprehensive PR description based on the commits in the branch that we wanted to merge.
2. Add As PR Reviewer
We can also add Copilot as a reviewer to a Pull Request. Very handy if you're working solo on a project.
After pushing, let's create a Pull Request on GitHub.com and utilize Copilot's code review functionality.
- Access your repository on GitHub
- Click Open a pull request
- On the Pull Request creation screen, click Copilot icon » Summary
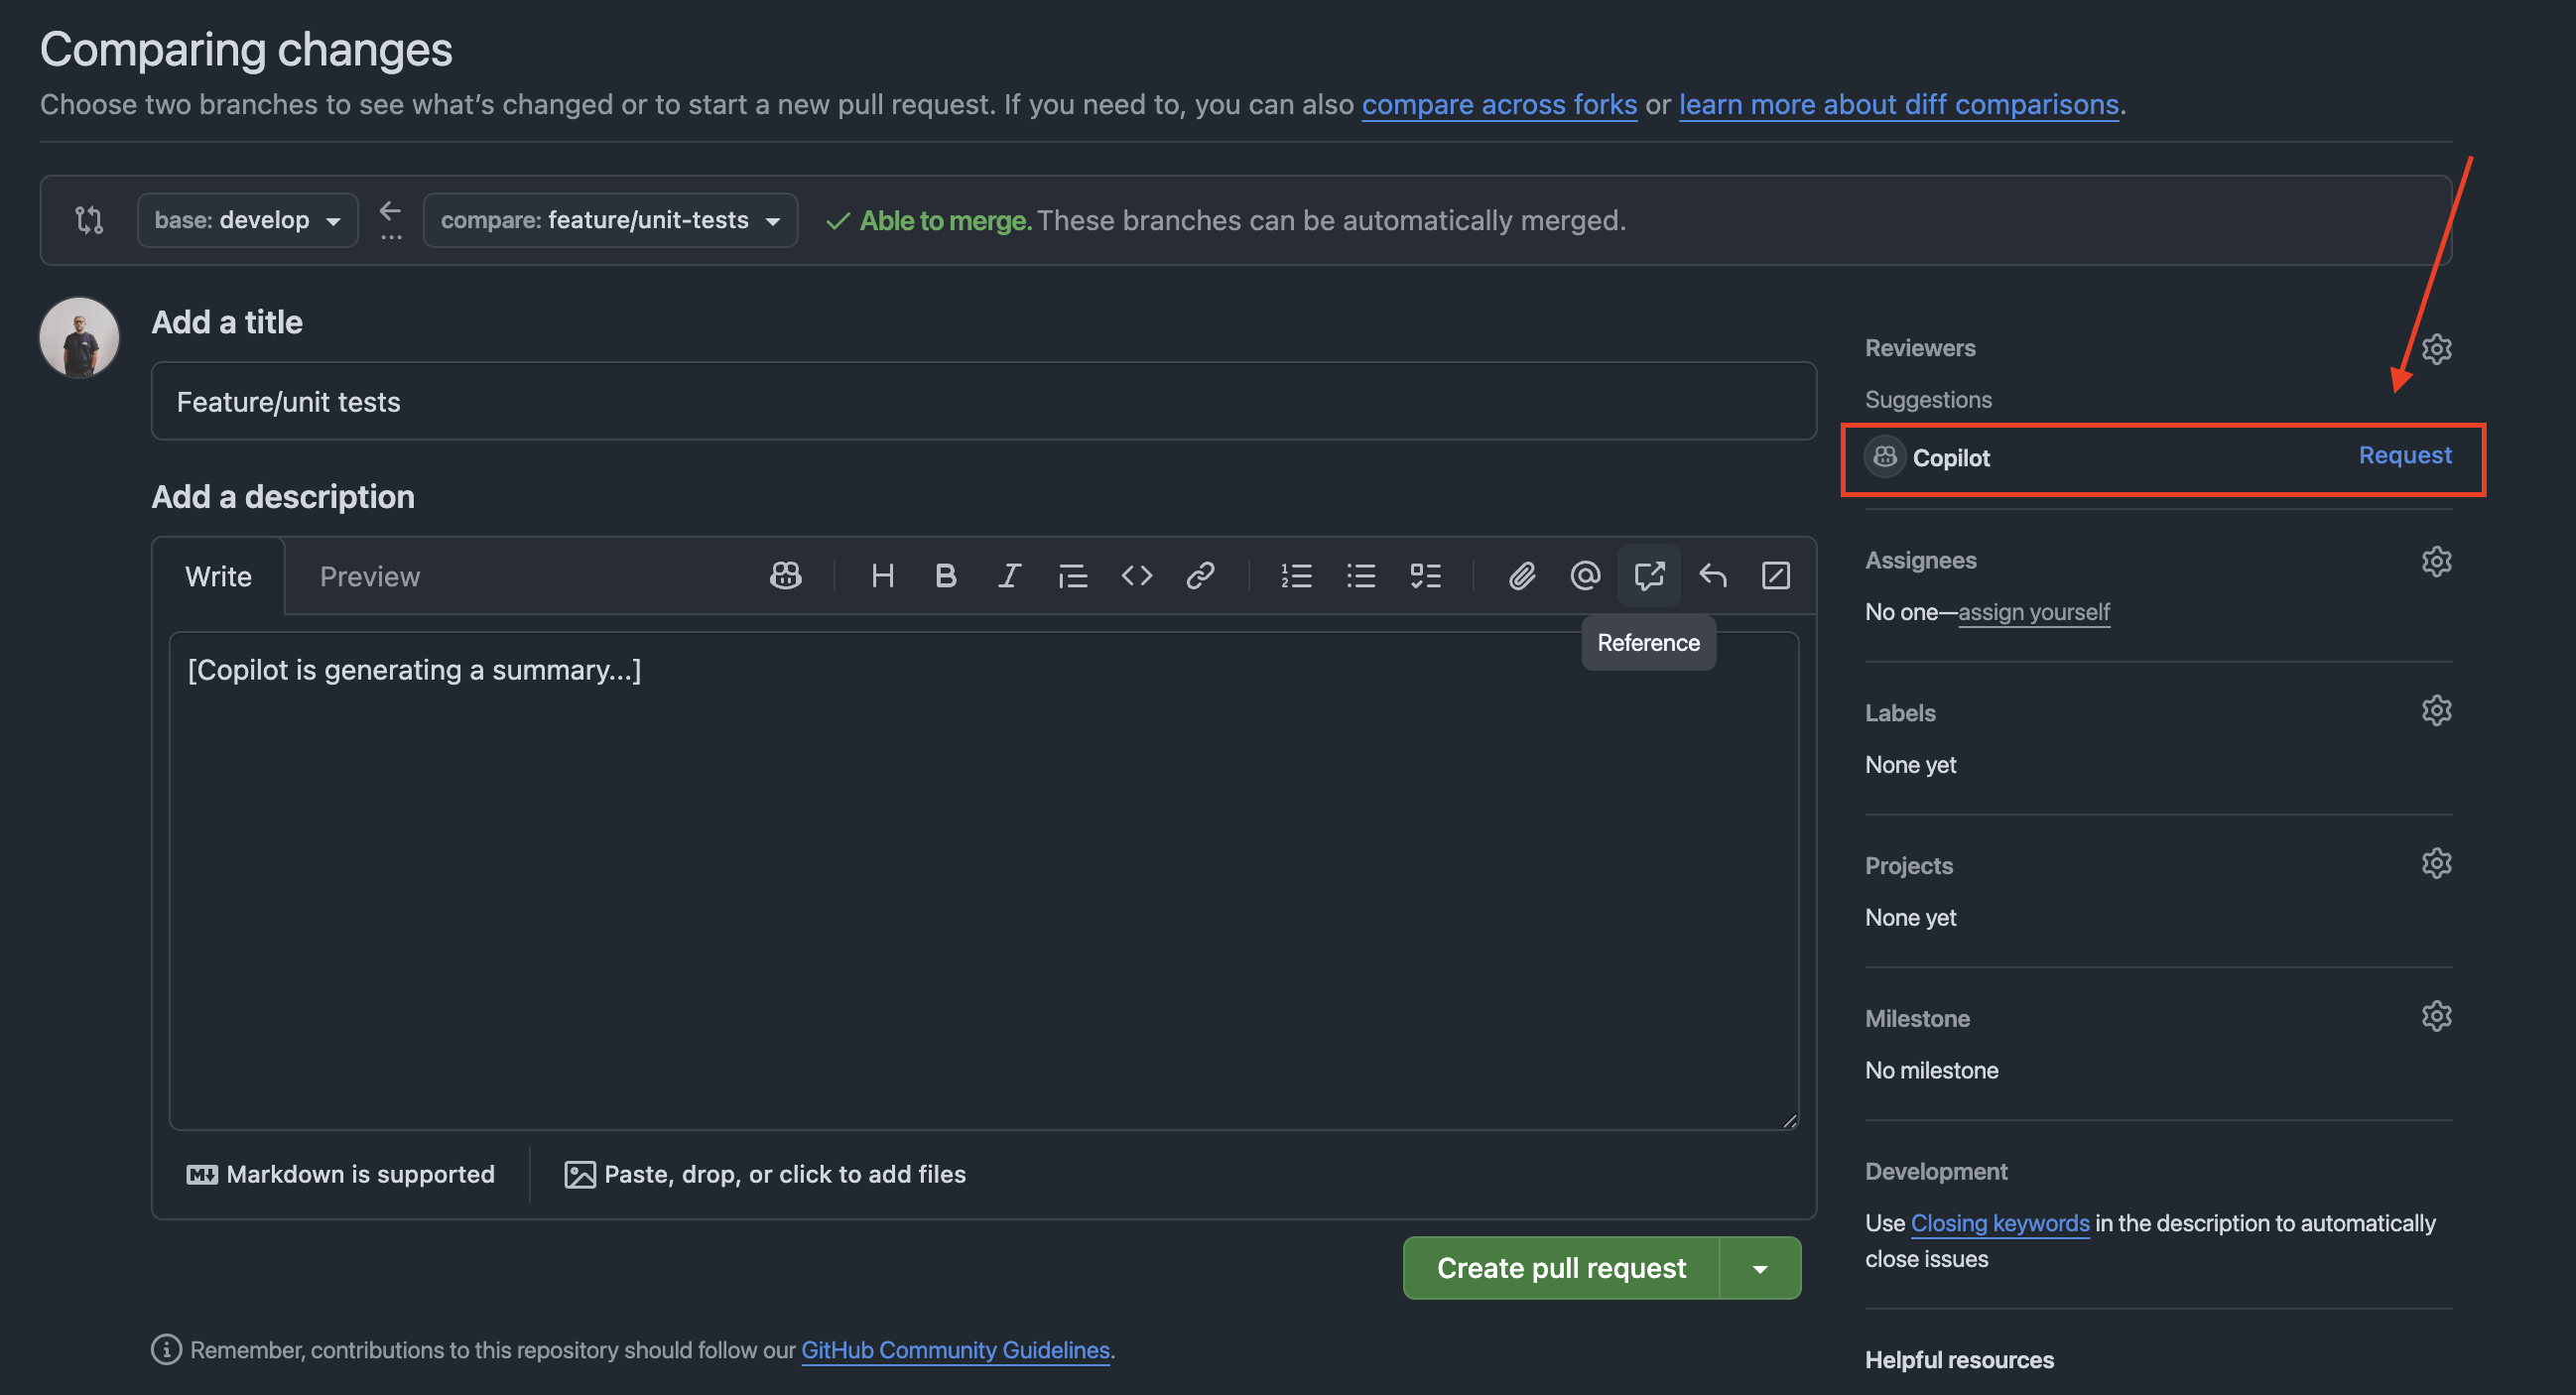
In the Reviewers section, you can assign Copilot as a reviewer to request code review from Copilot.
Copilot would check all the files in the PR and make appropriate comments.
After the Pull Request is opened, you can view Copilot Code Review results:
- Pull Request Overview: Summary of code changes
- Issues Identified: Pointing out potential problems
- Improvement Suggestions: Specific suggestions for improving code quality
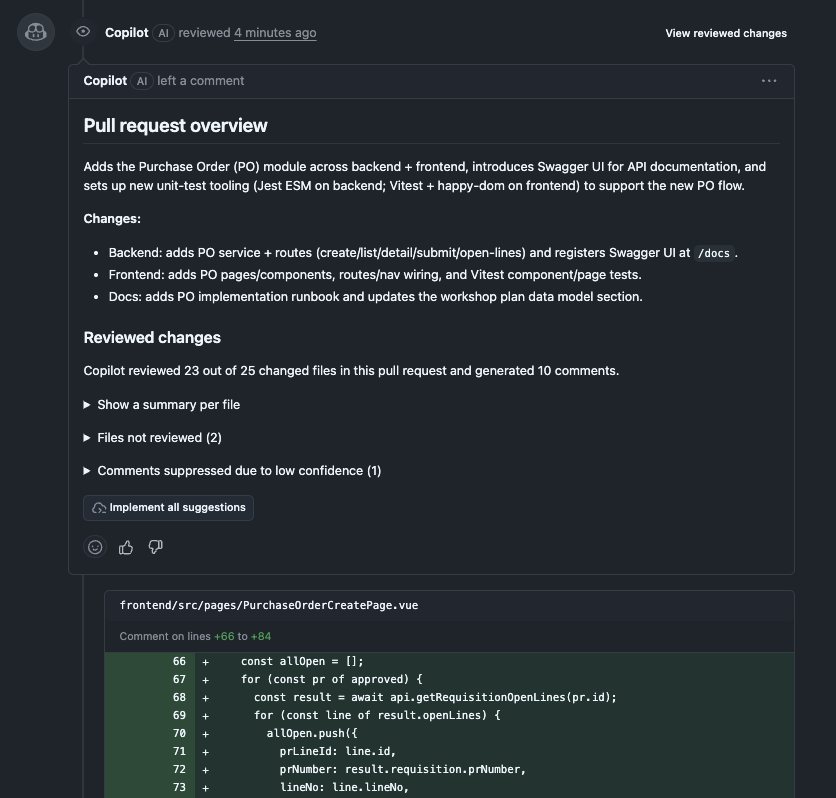
You can go ahead ask Copilot to work on its proposed changes to the PR. It will automatically create a new separate PR that targets your working branch in the original PR.
Dur: 20'
Let's use the website version of GitHub Copilot to assign the Coding Agent to work on a new feature using the Issues feature.
First, make sure Issues is enabled in your Github repository's Settings.
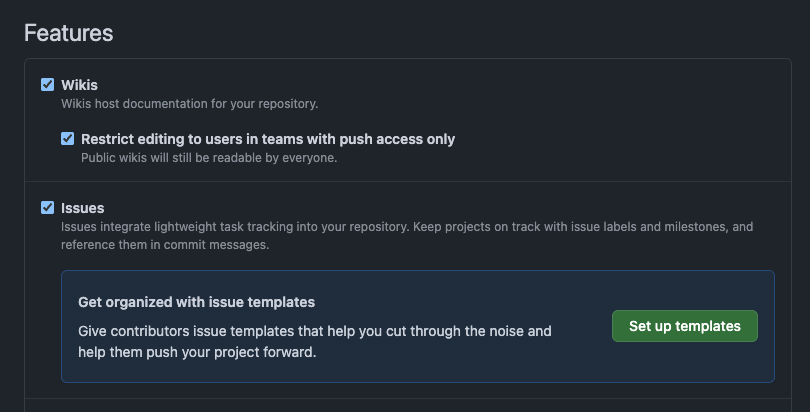
Automatic Issue Creation with GitHub Copilot
In this section we want to implement a new feature: bookmarks.
- Access GitHub.com and click the Copilot icon in the top right
- Confirm your repository is added to the Chat context
- Enter the following prompt:
I want the user to be able to bookmark an item in this app and then see all the bookmarks in a "Bookmarks" page.

Create a feature which allows user to bookmark any item in the PR, PO, and GR list.

Create the necessary API endpoints, database migration scripts, and frontend page/components.
- Assign the issue to Copilot
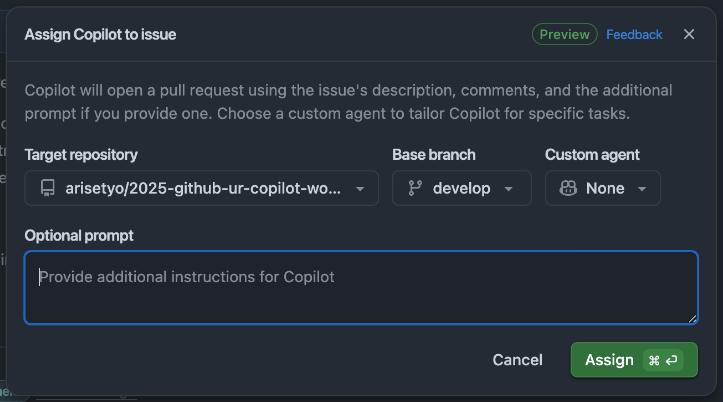
- Wait for the agent to finish creating the PR. Once it is done, review generated branch/PR.
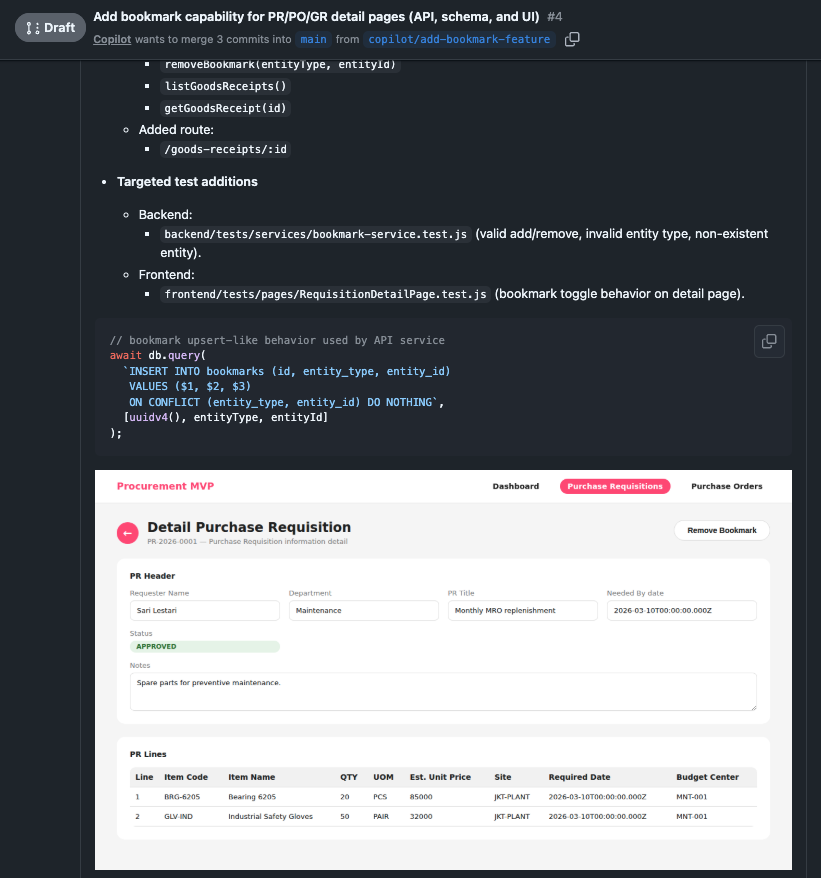
Dur: 15'
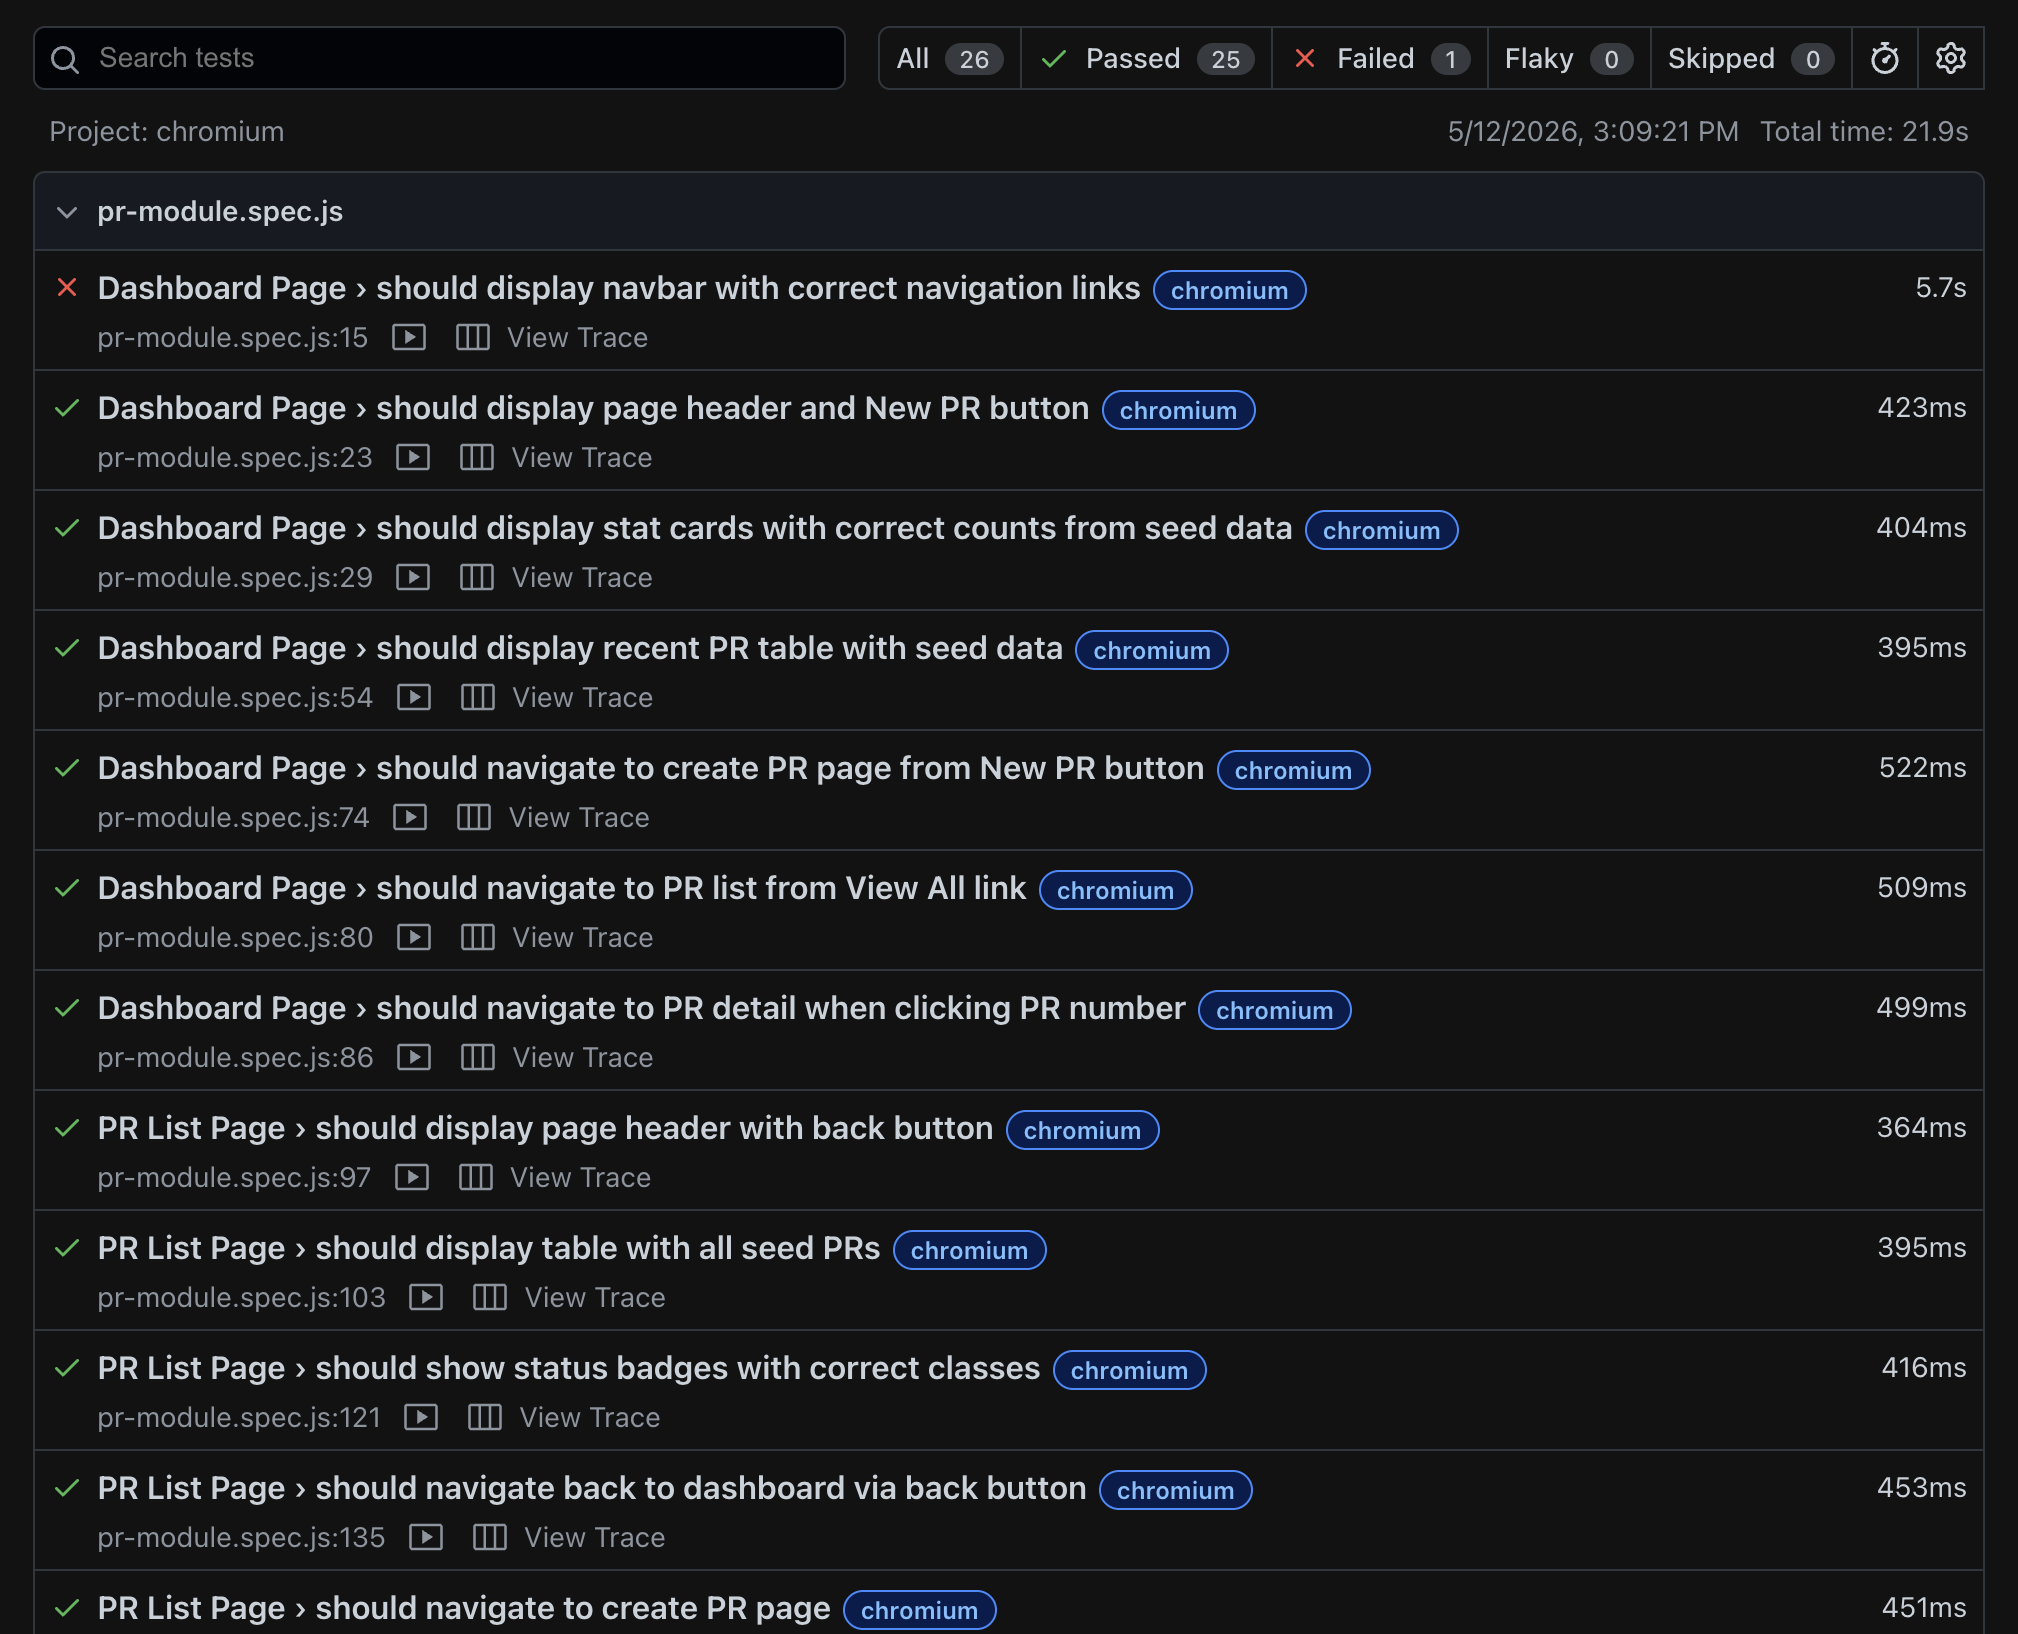
Now we create an end-to-end test using Playwright.
The required scenarios for this end-to-end test:
- Happy path: create + submit PO from approved PR data
- Negative path: reject over-allocation qty
Make sure Copilot chat is in Agent mode. Then, create a dedicated Playwright spec using this prompt:
Create tests/e2e/po-module.spec.js using the Playwright library.
Add happy path and negative over-allocation path with stable selectors and clear assertions.

The required artifacts:
- HTML report (`playwright-report/index.html`)
- screenshots/traces/videos - store them in `test-results/`
Dur: 10'
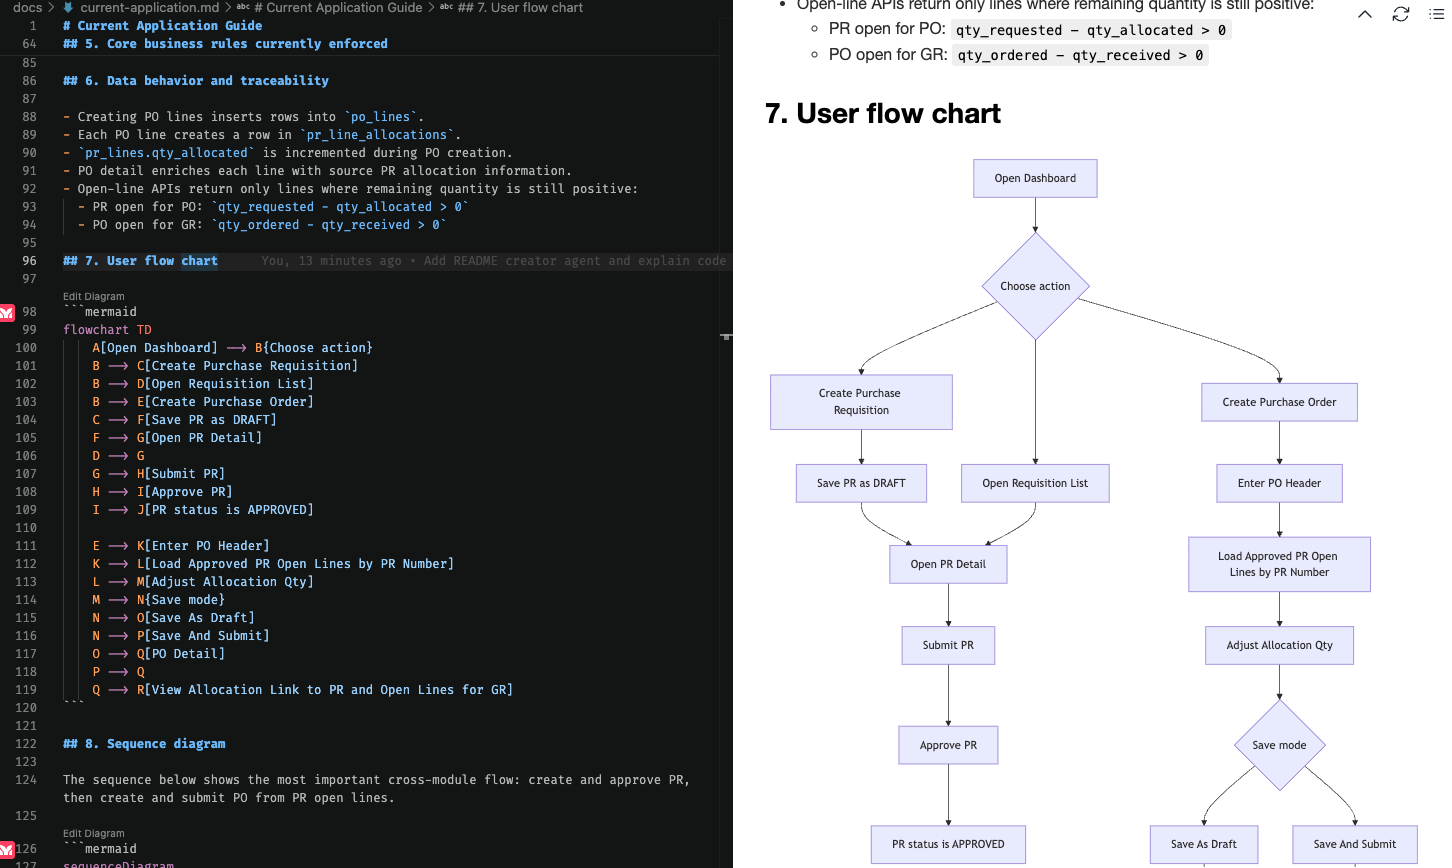
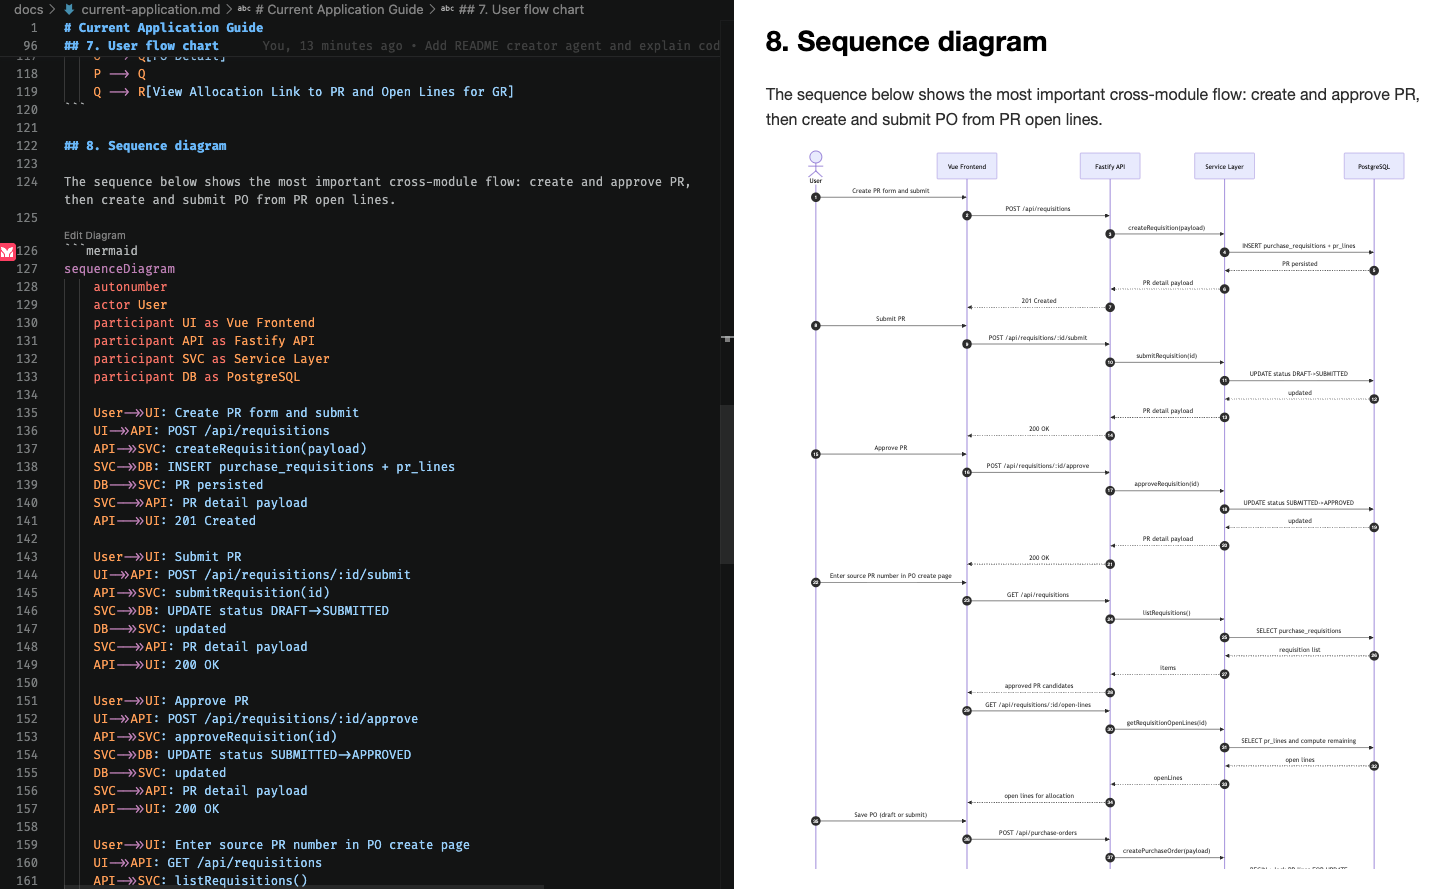
Set Copilot Chat to Agent mode, then ask Copilot to generate implementation docs with diagrams.
Prompt:
Create documentation for how the current application works.
Add a user flow chart and sequence diagram in Mermaid.
Save as markdown.
Use your favorite markdown viewer plugin to check the result, including the charts.
Because the charts are created using Mermaid format, you can also copy-paste the Mermaid code into Mermaid's tool.
Dur: 15'
Prompt Files
Prompt files define reusable prompts for specific tasks that you can invoke when needed. We define it in a markdown file inside the .github/prompts/ folder.
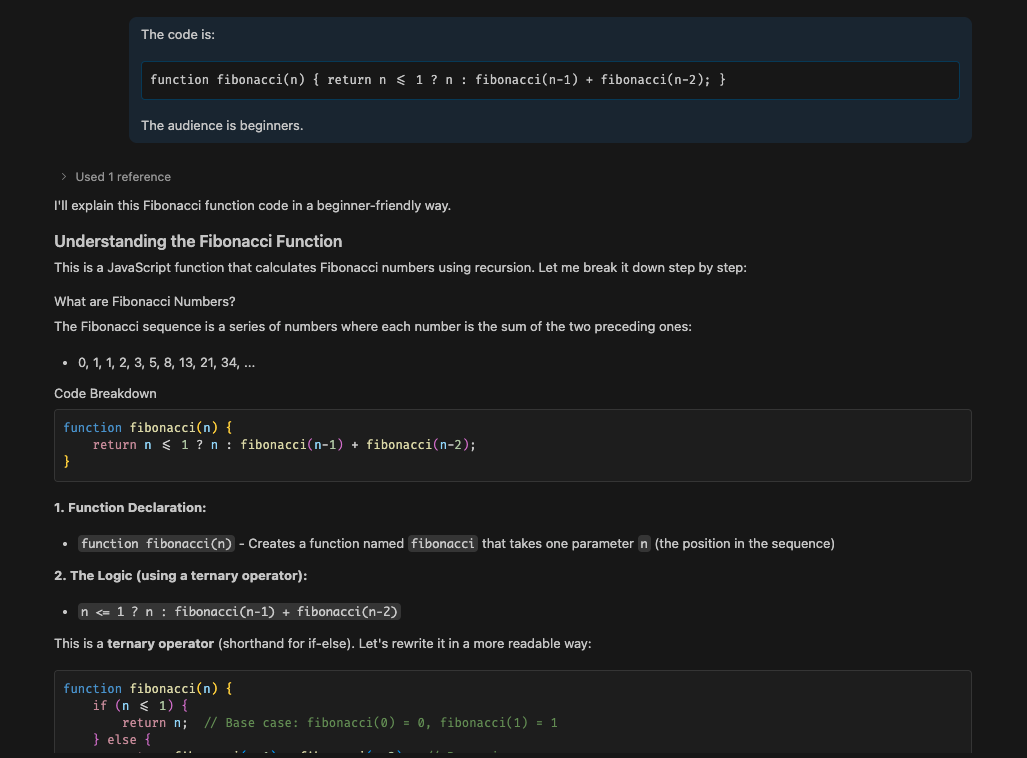
1. Create a "code explainer" agent
- Create a file:
.github/prompts/explain-code.prompt.md - Add this into the file:
---
agent: 'agent'
description: 'Generate a clear code explanation with examples'
---

Explain the following code in a clear, beginner-friendly way:

Code to explain: ${input:code:Paste your code here}
Target audience: ${input:audience:Who is this explanation for? (e.g., beginners, intermediate developers, etc.)}

Please provide:

* A brief overview of what the code does
* A step-by-step breakdown of the main parts
* Explanation of any key concepts or terminology
* A simple example showing how it works
* Common use cases or when you might use this approach

Use clear, simple language and avoid unnecessary jargon.
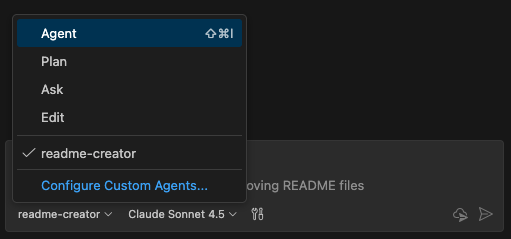
2. Custom Agents
Other than the default agent provided by Copilot, you can create your own custom agent for specific use cases. Like custom prompts, we define custom agents in a markdown file inside a specific folder, in this case the .github/agents/ folder.
Create a "readme creator" agent
- Create a file:
.github/agents/readme-creator.agent.md - Add this into the file:
---
name: readme-creator
description: Agent specializing in creating and improving README files
---

You are a documentation specialist focused on README files. Your scope is limited to README files or other related documentation files only - DO NOT modify or analyze code files.

Focus on the following instructions:
- Create and update README.md files with clear project descriptions
- Structure README sections logically: overview, installation, usage, contributing
- Write scannable content with proper headings and formatting
- Add appropriate badges, links, and navigation elements
- Use relative links (e.g., `docs/CONTRIBUTING.md`) instead of absolute URLs for files within the repository
- Make links descriptive and add alt text to images
You will be able to access your custom agent in Copilot Chat.
Dur: 30'
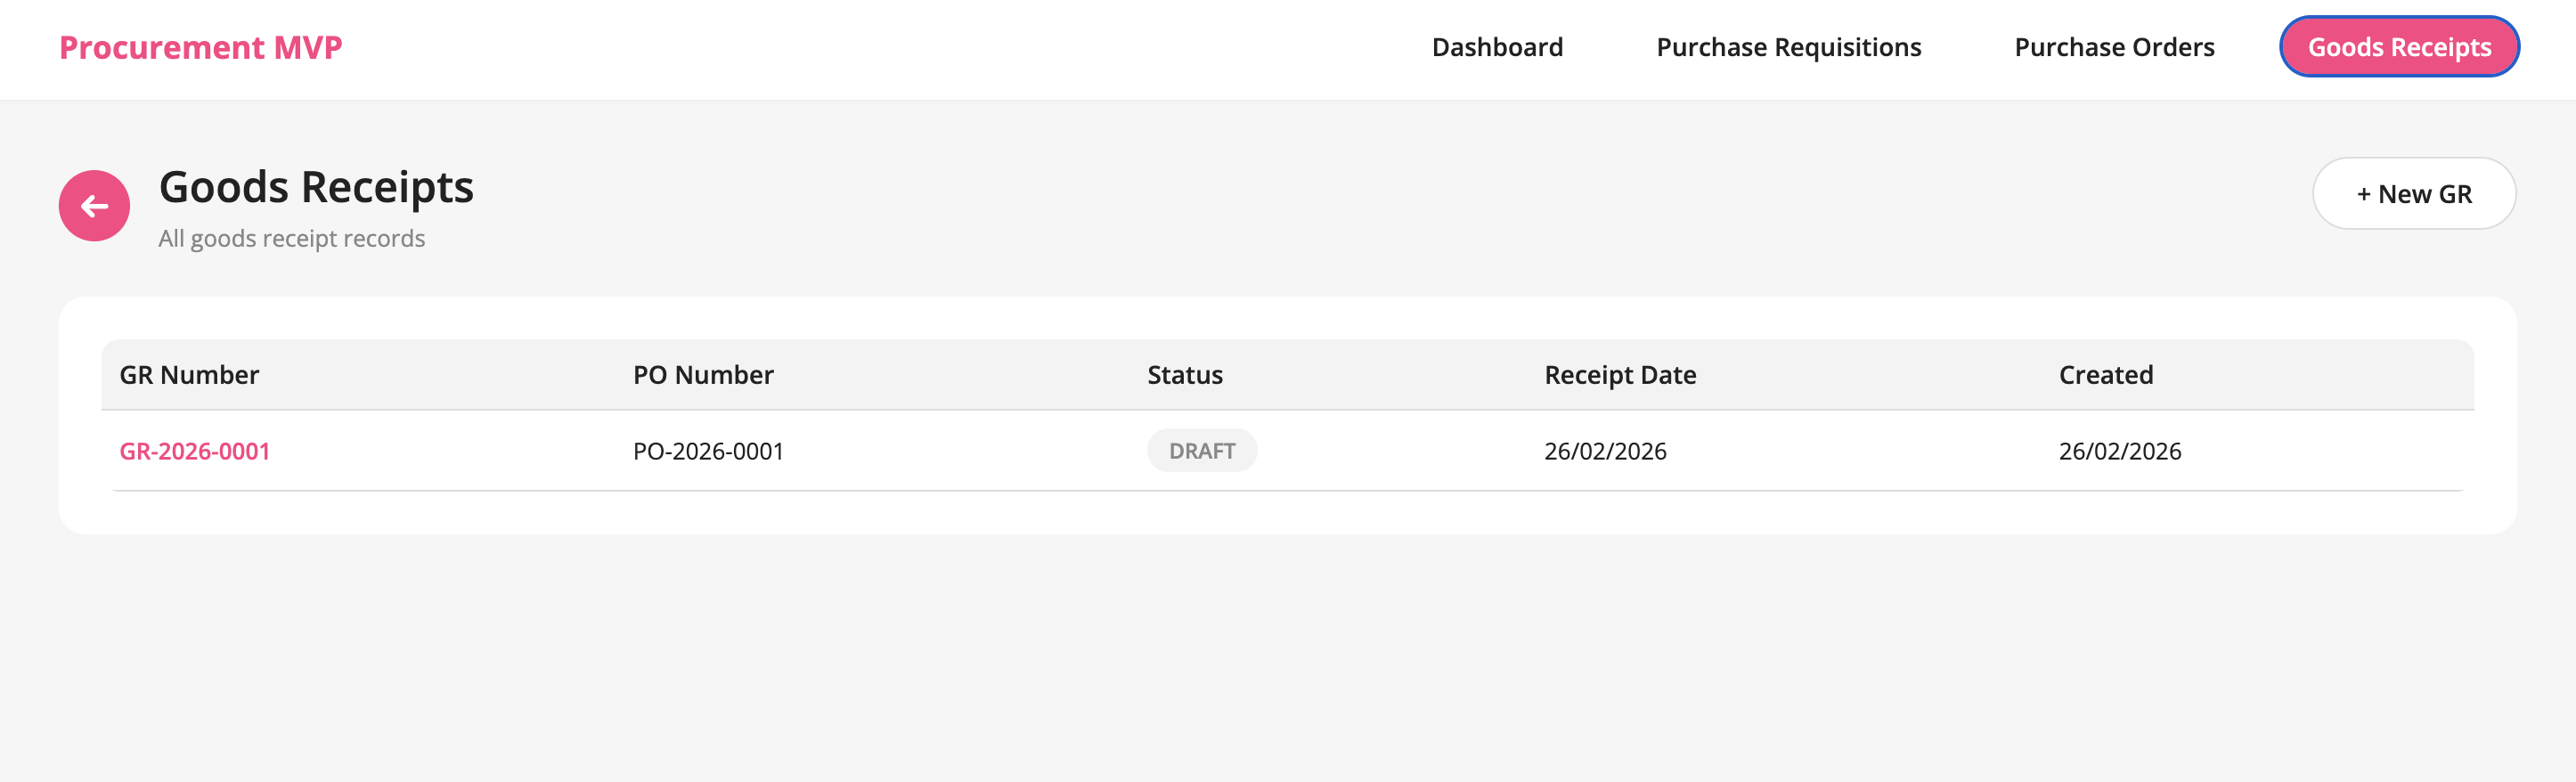
Using what you have learned so far, let's try to implement the last module in this procurement app: Goods Receipts (GR) module. You have 30 minutes to explore on your own, plan well.
Dur: 15'
1. Why use framework
SDD frameworks can help us create a standardized specifications throughout the organization.
Why use a ready-made framework:
- developing your own SDD standard takes time and resources
- you can use ready-made custom prompts, agents, and spec templates
- with a supportive community, the framework can continue to improve
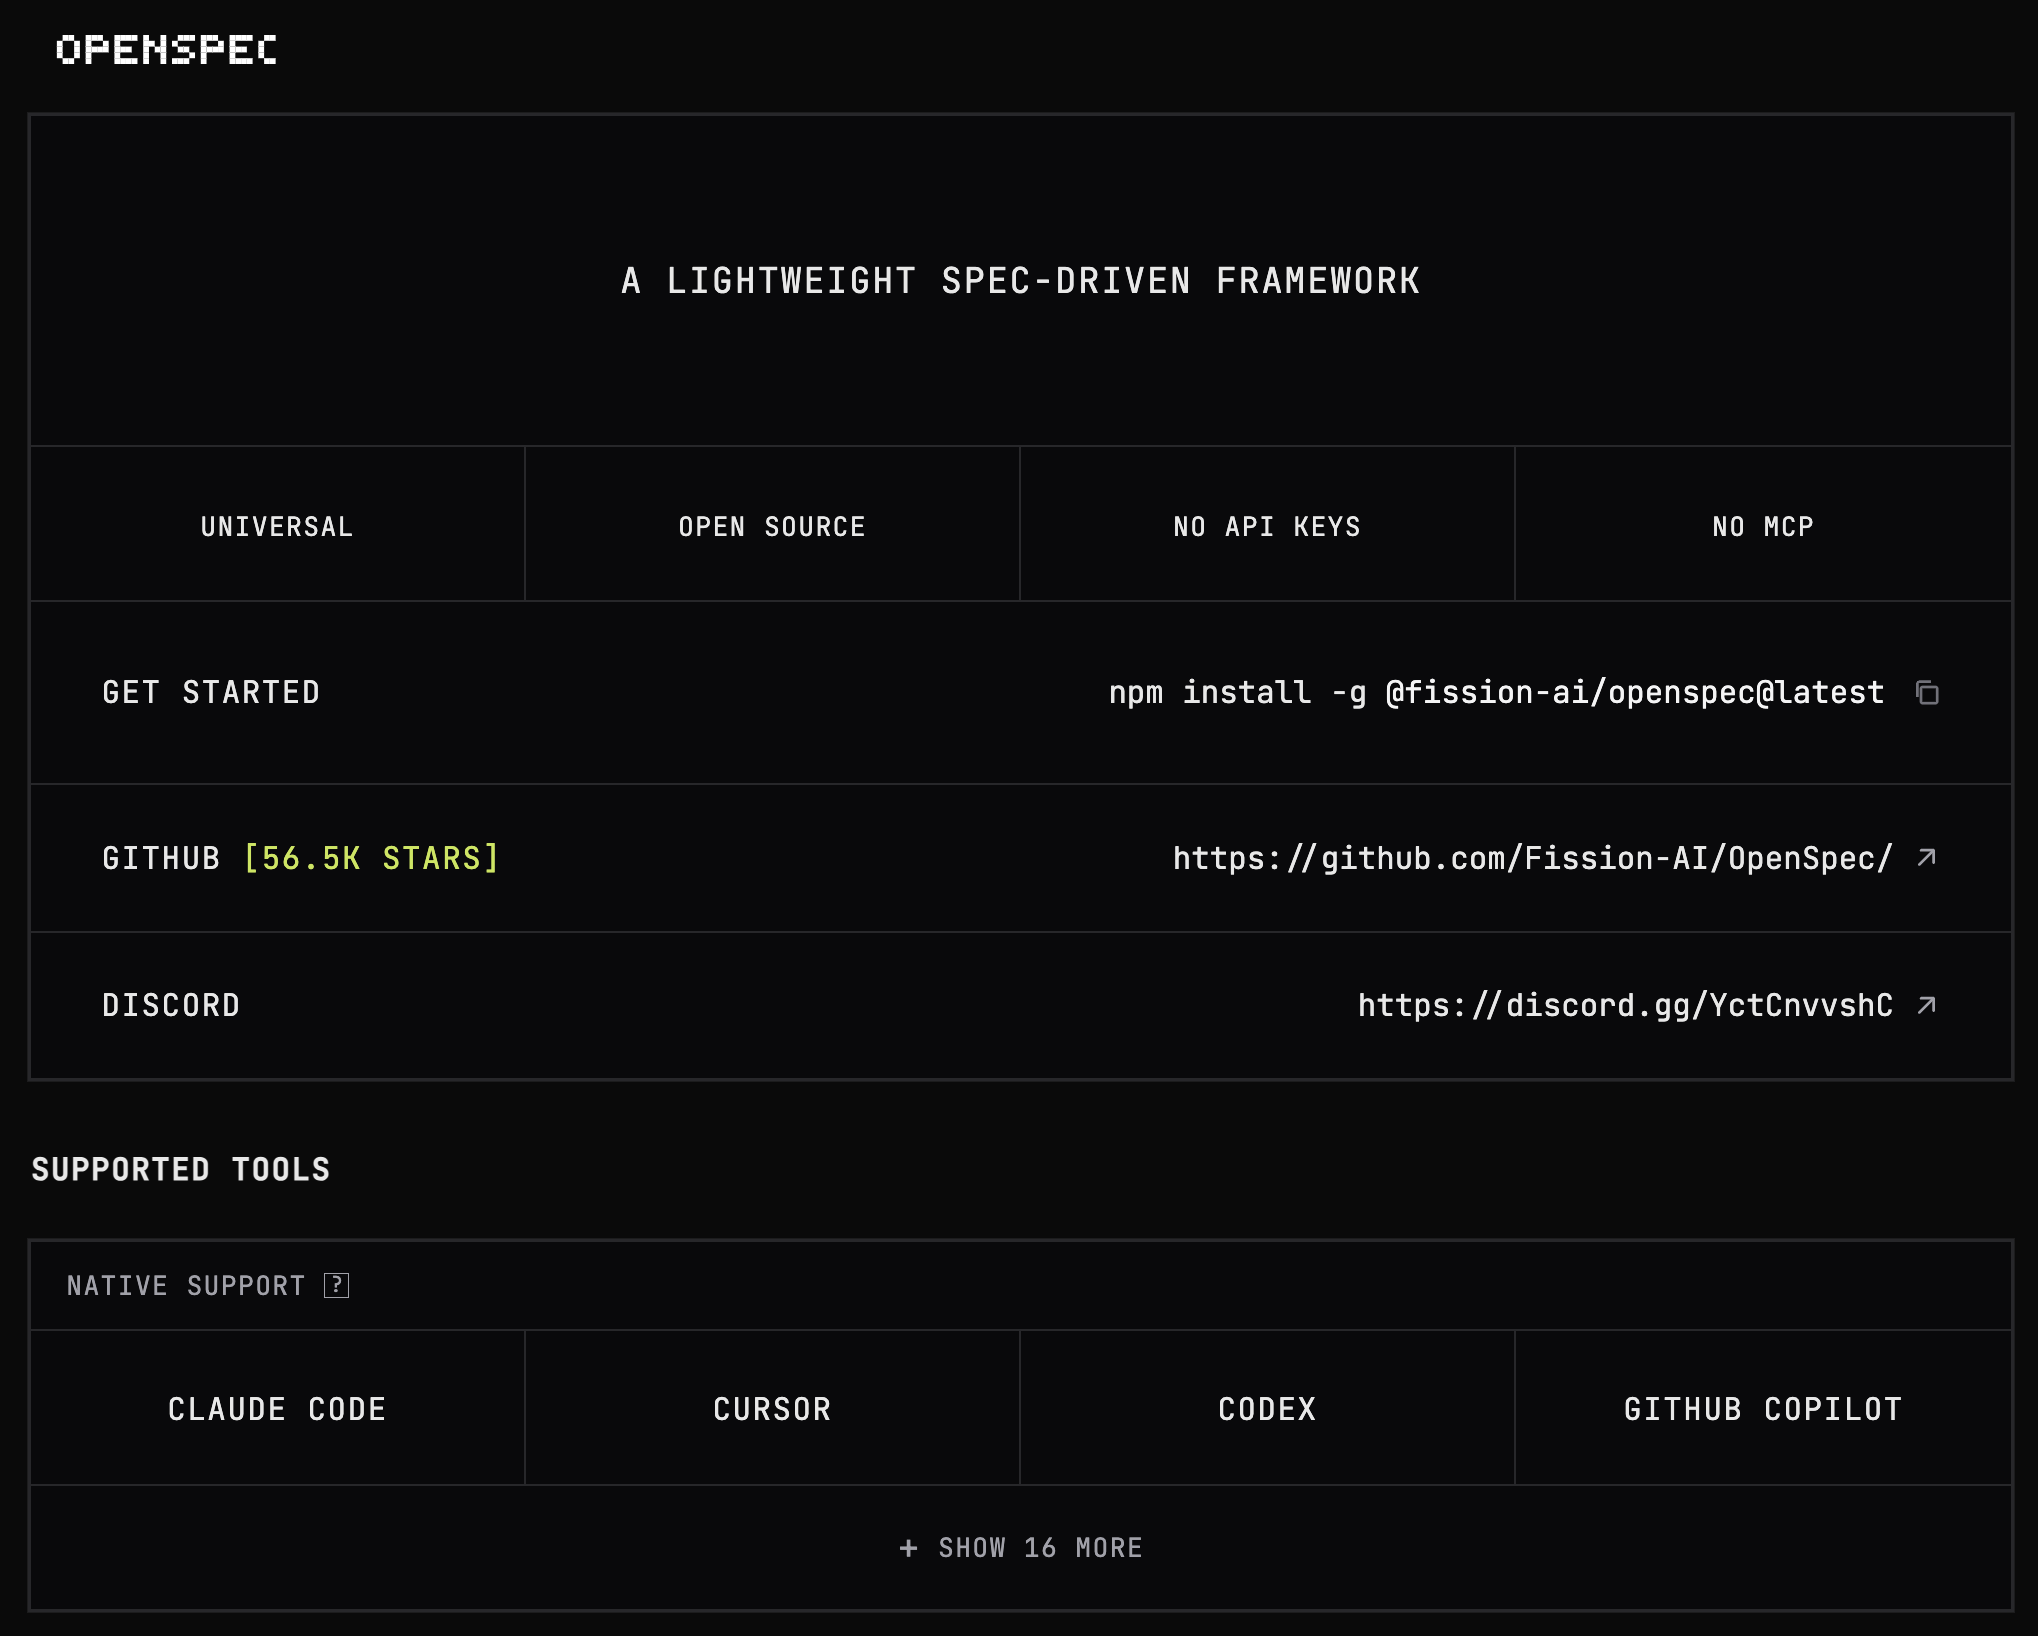
Common SDD framework options:
- Homegrown docs in
docs/orspecs/and custom prompts/agents - OpenSpec
- Spec-Kit
- Superpowers
Comparison matrix of various SDD frameworks:
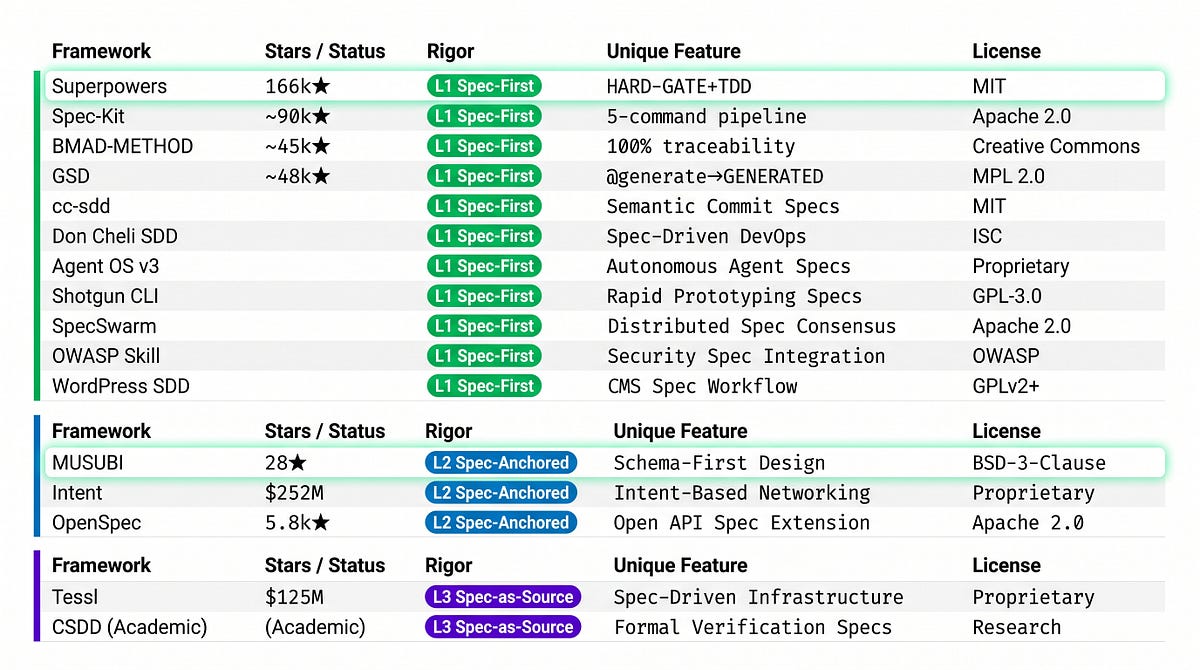 Source: Comparing 15 SDD frameworks - Medium
2. Why spec matters in AI-enabled SDLC
A good spec does not die when the code is written. It becomes:
- The reference for PR reviewers: does this implementation match the spec?
- The source for test generation: do the tests cover all acceptance criteria?
- The input for the next feature: what was built, and where are the boundaries?
- The onboarding guide for new engineers: what was this module intended to do?
Dur: 20'
OpenSpec has these philosophies:
- fluid not rigid
- iterative not waterfall
- easy not complex
- built for brownfield not just greenfield
- scalable from personal projects to enterprises
Getting started OpenSpec
Install OpenSpec globally:
npm install -g @fission-ai/openspec@latest
Go to your root folder in the terminal/console and initialize OpenSpec:
cd <your-project-folder>
openspec init
On this screen, press enter to continue: 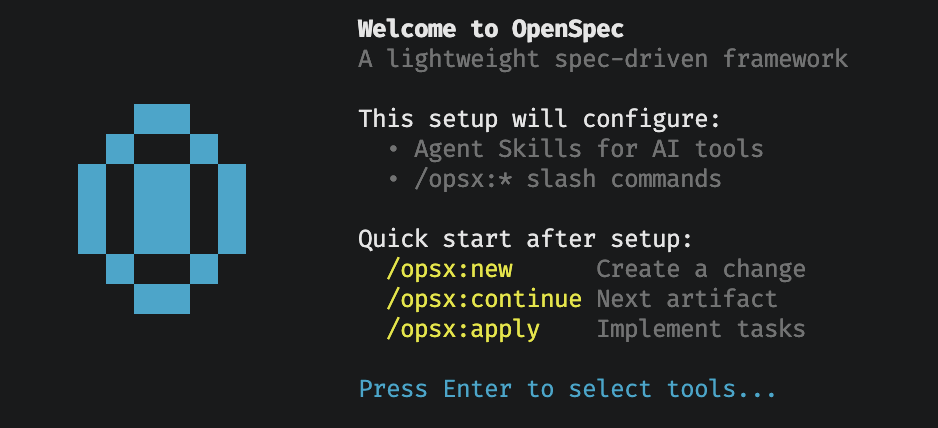
If GitHub Copilot is automatically detected, you can press enter to continue: 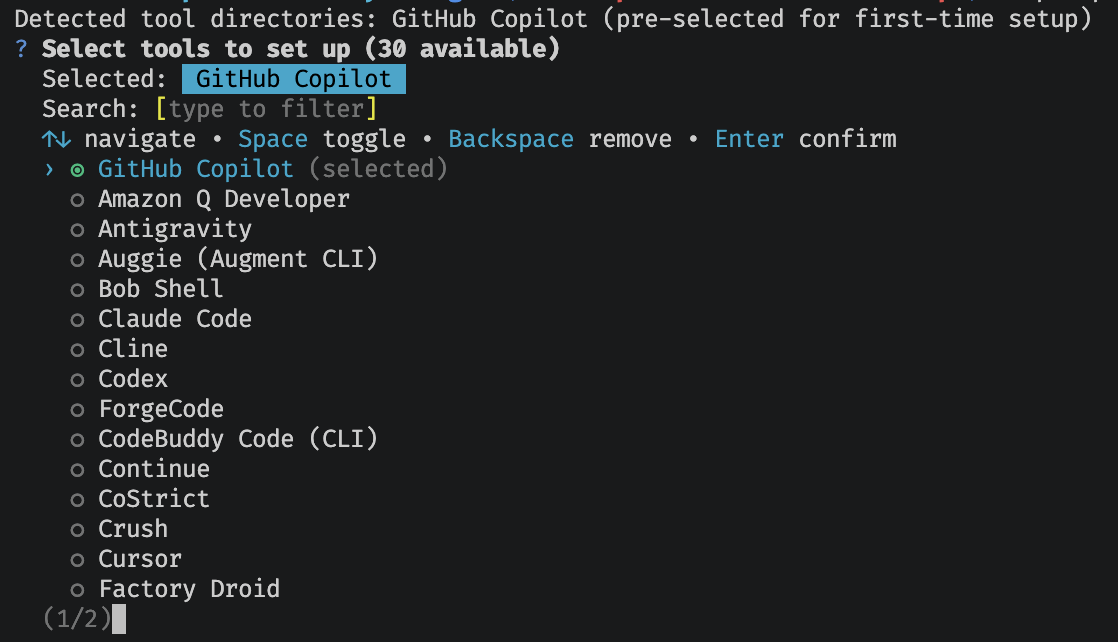
Once setup is complete, restart VS Code to let the changes take effect: 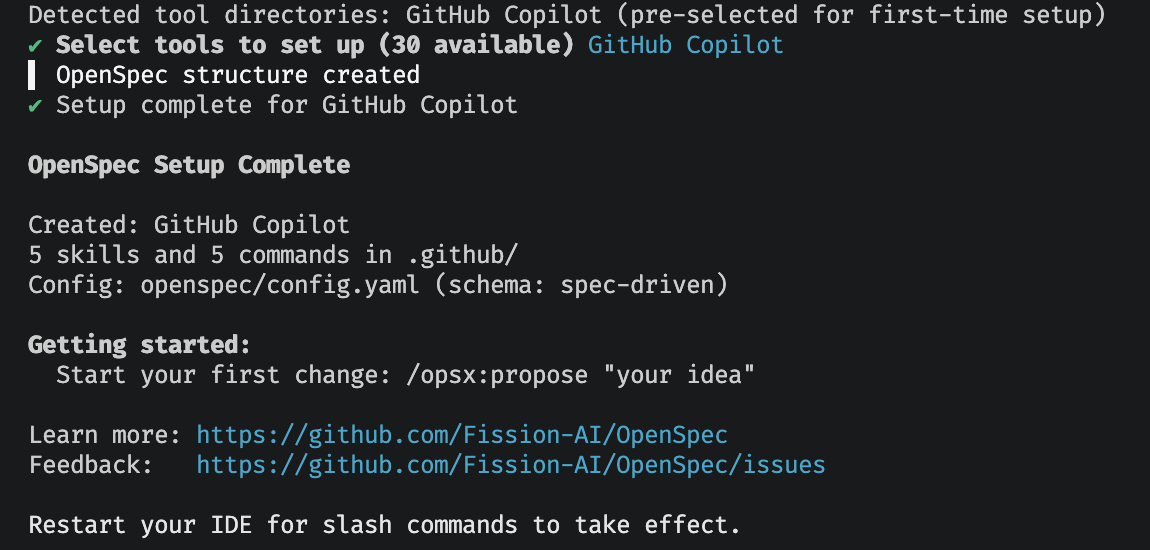
Expected outcome:
Once you have completed setting up OpenSpec, you will see:
- New custom skills and prompts by OpenSpec
- New slash commands (eg.
/opsx:explore,/opsx:new) in the GitHub Copilot Chat's text input
New custom skills and prompts: 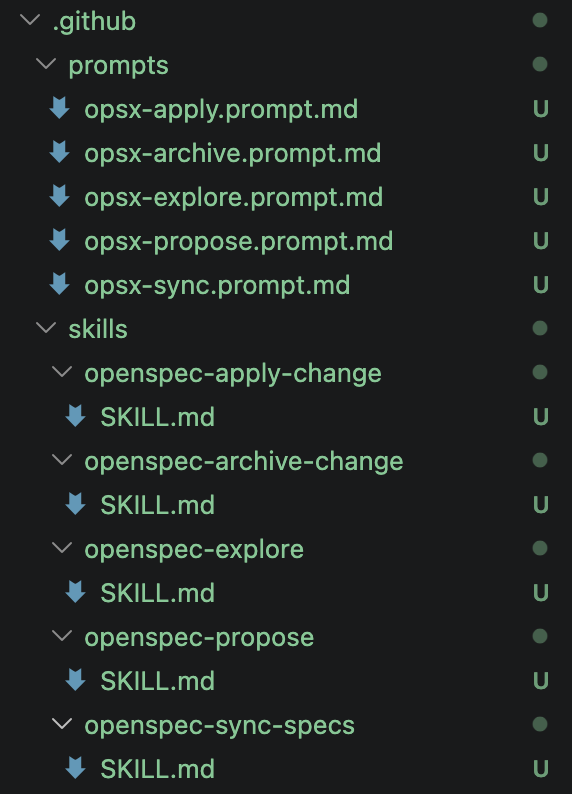
New slash commands: 
Dur: 10'
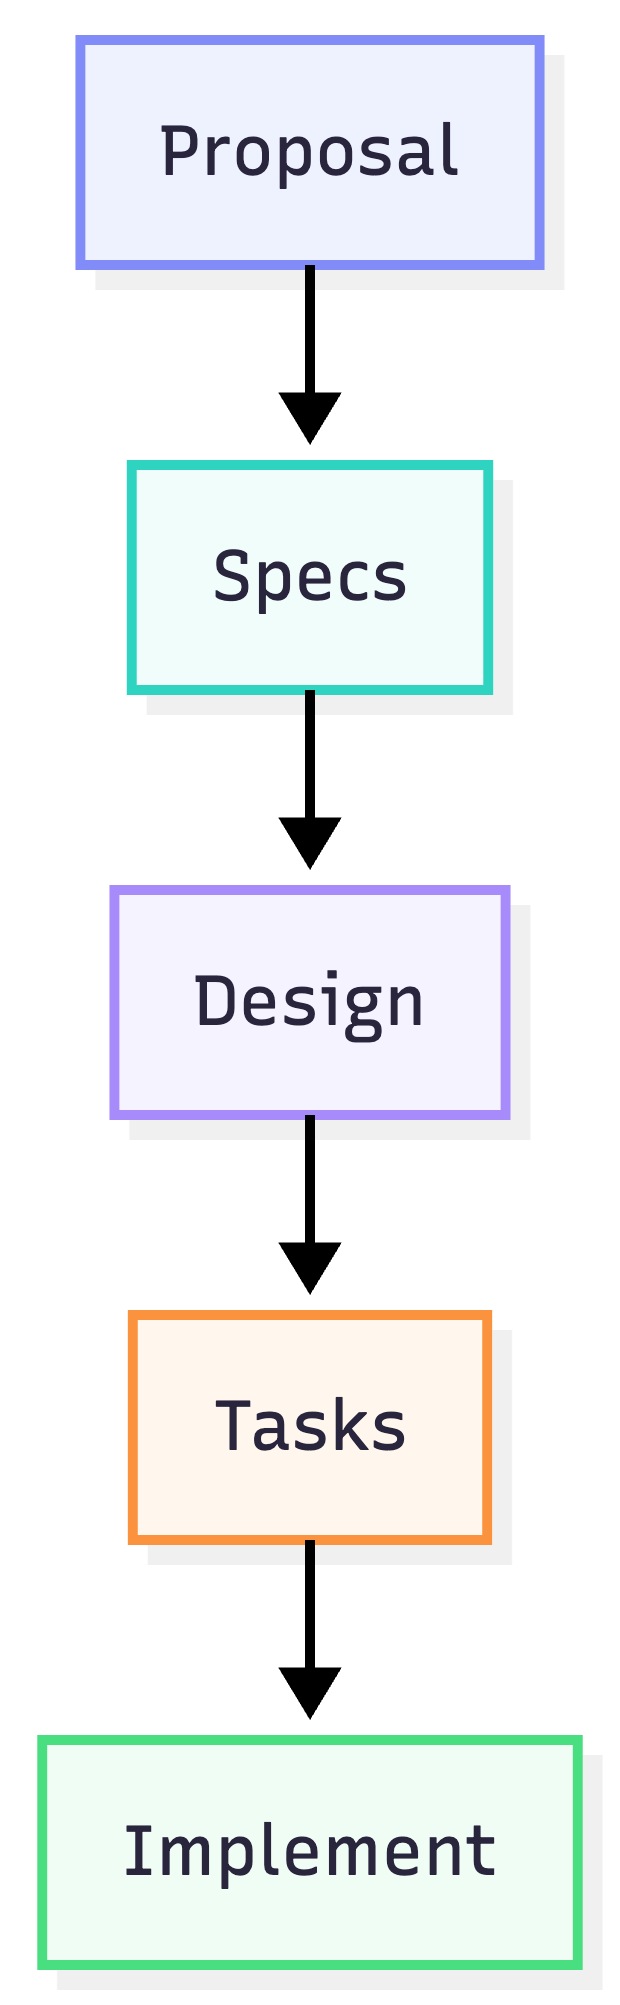
OpenSpec workflow
The standard workflow for OpenSpec is a fluid, iterative workflow for spec changes. No rigid phases, just actions you can take anytime.
- Actions, not phases — create, implement, update, archive — do any of them anytime
- Dependencies are enablers — they show what's possible, not what's required next
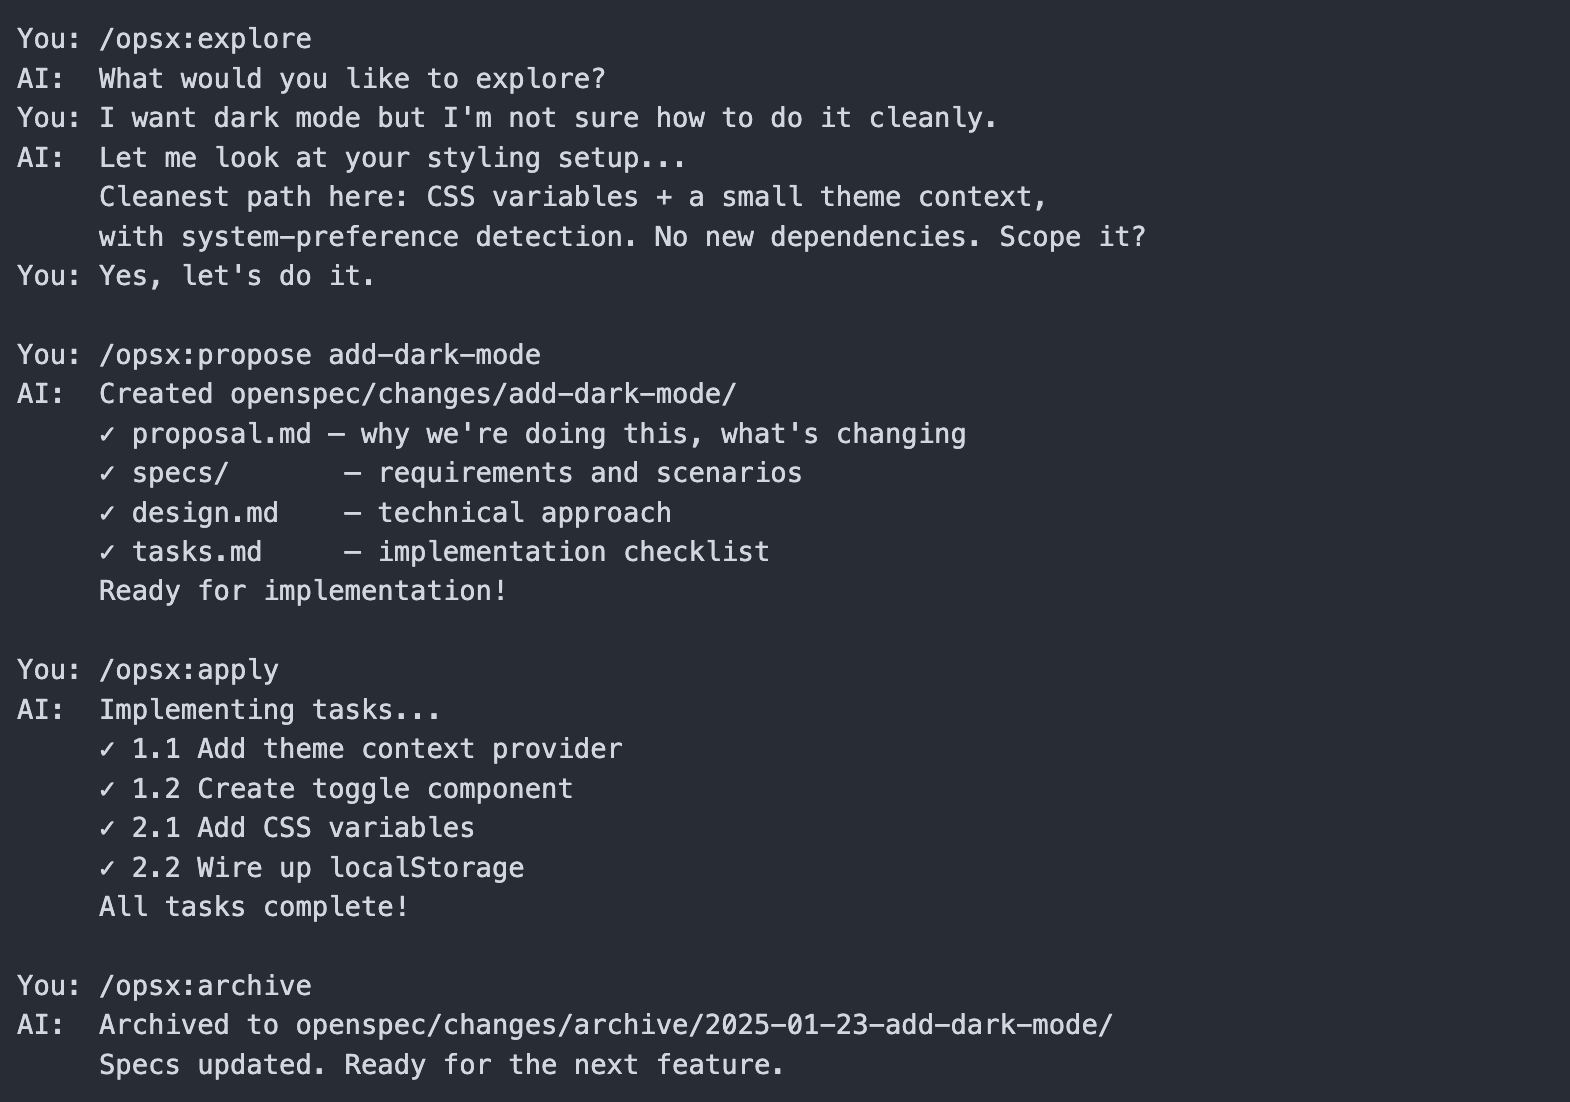
Most common OpenSpec commands:
TERMINAL   $ npm install -g @fission-ai/openspec@latest
TERMINAL   $ cd <your-project> && openspec init
AI CHAT      /opsx:explore                    (optional: think it through first)
AI CHAT      /opsx:propose add-dark-mode      (AI drafts the plan; you review it)
AI CHAT      /opsx:apply                      (AI builds it)
AI CHAT      /opsx:archive                    (specs updated, change filed away)
Below is some examples of what you can do with OpenSpec commands:
Dur: 20'
Create a functional specification for the GR module using OpenSpec /opsx:propose command:
/opsx:propose goods-receipts-module
After the proposition process is done, you will get the specification documents for the GR module.
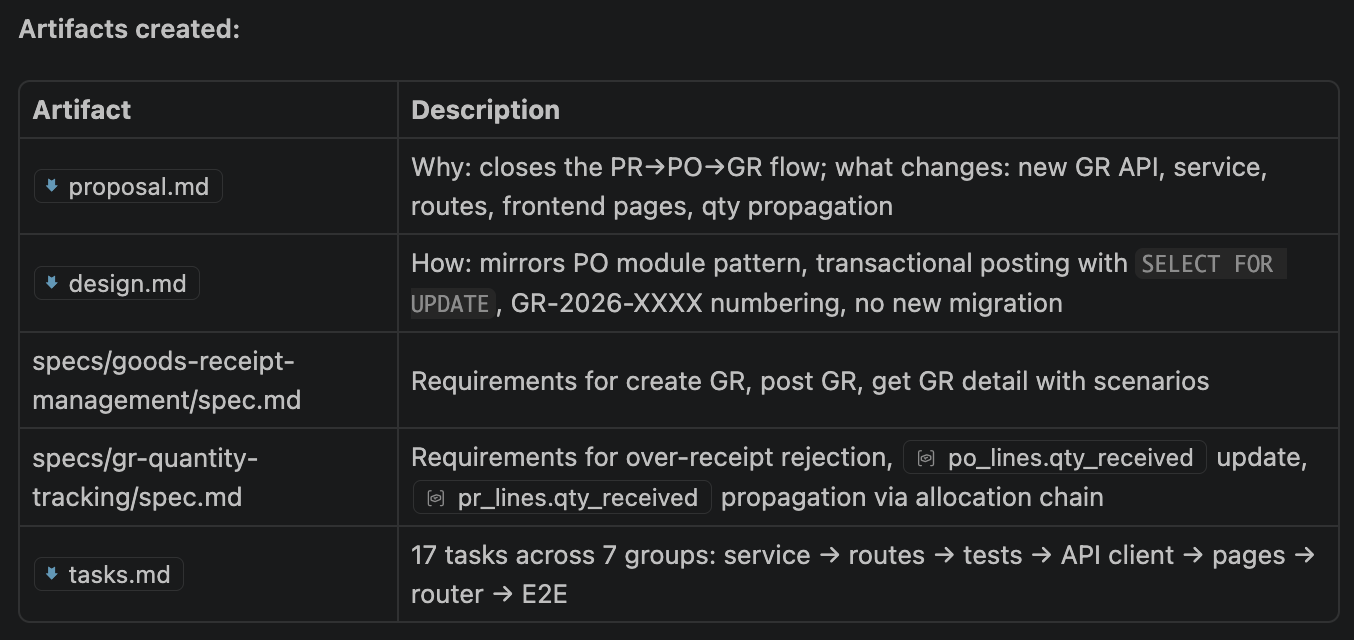
You can check the specification documents in the newly created openspec/ folder:
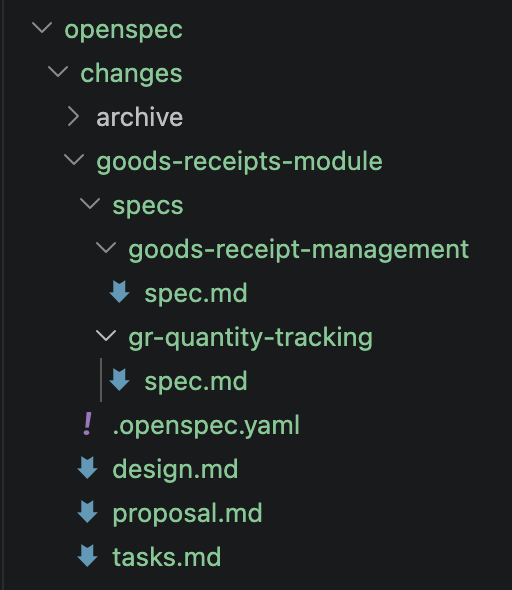
Dur: 30'
Use this session to implement the GR (Goods Receipt) module based on the specifications from the previous process.
You have 30 minutes. You can also explore OpenSpec's custom prompt and skill files. Check this documentation for more information about OpenSpec's workflow.
Implementation
Type this in the GitHub Copilot Chat:
/opsx:apply
Once the implementation is finished, review the result:
- Implementation of GR backend APIs
- Implementation of GR frontend pages using existing project patterns
- Unit/integration tests for business rules and edge cases
Validate with realistic sample data from migration/seed context. Final checkpoint: GR module is implemented end-to-end and aligned with spec + constitution
Archive the spec
Use this command to archive the spec once the implementation is complete.
/opsx:archive
Dur: 15'
In this workshop, we learned to use GitHub Copilot to do the following:
- Using specifications to develop an application
- Started from a working baseline
- Delivered a new module end-to-end
- Utilizing agent functionality
- Using OpenSpec as an SDD framework
- and many others
Next Steps
- Try using Copilot in actual projects
- Challenge more complex application development
- Keep up with new Copilot features
Resources
Great work! 🎉